12 Dot Day Shirt Ideas for a Fun and Creative School Celebration

Dot Day Shirt Ideas
Dot Day is such a fun excuse to turn a plain shirt into something colorful, playful, and completely personal. I love these projects because they do not require advanced crafting skills, and most can be made with inexpensive supplies you may already have at home.

The biggest lesson I’ve learned with DIY shirts is that preparation matters more than having fancy materials. Washing the shirt first, protecting the fabric underneath, and allowing paint or glue to dry properly can make the difference between a shirt that lasts all day and one that cracks or smears after the first wash.
1. Colorful Confetti Dot Shirt
Description
This is one of the easiest Dot Day shirts to make because it uses simple circles in different colors. I recommend starting with a white or light-colored cotton shirt so the dots stand out clearly. The trick is to vary the sizes instead of making every dot identical. A few overlapping circles also make the design look more playful and handmade.

What It Is
A bright shirt covered with colorful painted dots that look like confetti scattered across the front.
Supplies and Budget
- Plain cotton T-shirt
- Fabric paint in 4–6 colors
- Round sponge daubers
- Cardboard
- Small paint tray
Budget: approximately $8–$15 depending on the paint you already have.
Tutorial how to make:
Wash and dry the shirt first without fabric softener. Place cardboard inside to prevent paint from bleeding through. Dip a round sponge lightly into fabric paint and press it straight onto the shirt. Create large, medium, and small dots across the front, leaving some open space. Let each color dry before adding overlapping dots.
DIY Tip
Do not overload the sponge with paint. Too much paint creates thick edges and can cause the dots to crack after washing.
2. Rainbow Dot Day Shirt
Description
A rainbow dot design gives you a cheerful shirt without requiring complicated drawing skills. I like arranging the dots in loose color bands rather than making a perfectly straight rainbow. This small amount of irregularity makes the shirt look handmade and gives children or adults more freedom to create their own version.

What It Is
A colorful Dot Day shirt featuring red, orange, yellow, green, blue, and purple circles arranged in a loose rainbow pattern.
Supplies and Budget
- Plain white T-shirt
- Six fabric paint colors
- Round sponge applicators
- Cardboard insert
- Pencil
Budget: approximately $10–$18.
Tutorial how to make:
Lightly sketch the general curve of a rainbow with a pencil. Add dots along each section using one color at a time. Keep the circles different sizes and leave small gaps between some of them. Allow the shirt to dry completely before removing the cardboard.
DIY Tip
Use a lighter touch when making smaller dots. Pressing too hard with the sponge can turn a small circle into a large blob.
3. Big Center Dot Shirt
Description
For a quick project that still looks intentional, create one large colorful dot in the center and surround it with smaller circles. This design is especially useful when you need a Dot Day shirt at the last minute. I find that limiting the palette to three or four colors keeps the large central shape from becoming visually messy.

What It Is
A simple statement shirt with one oversized colorful dot surrounded by smaller decorative dots.
Supplies and Budget
- Plain T-shirt
- Fabric paint
- Large round sponge
- Smaller sponge daubers
- Cardboard
Budget: approximately $7–$15.
Tutorial how to make:
Insert cardboard inside the shirt and place the shirt flat. Use a large sponge to create one central circle. Once it has dried slightly, add smaller dots around it using two or three contrasting colors. Let the entire design dry according to the fabric paint instructions.
DIY Tip
Put the large dot slightly above the exact center of the shirt. It usually looks more natural than trying to position it with perfect mathematical precision.
4. Polka Dot Name Shirt
Description
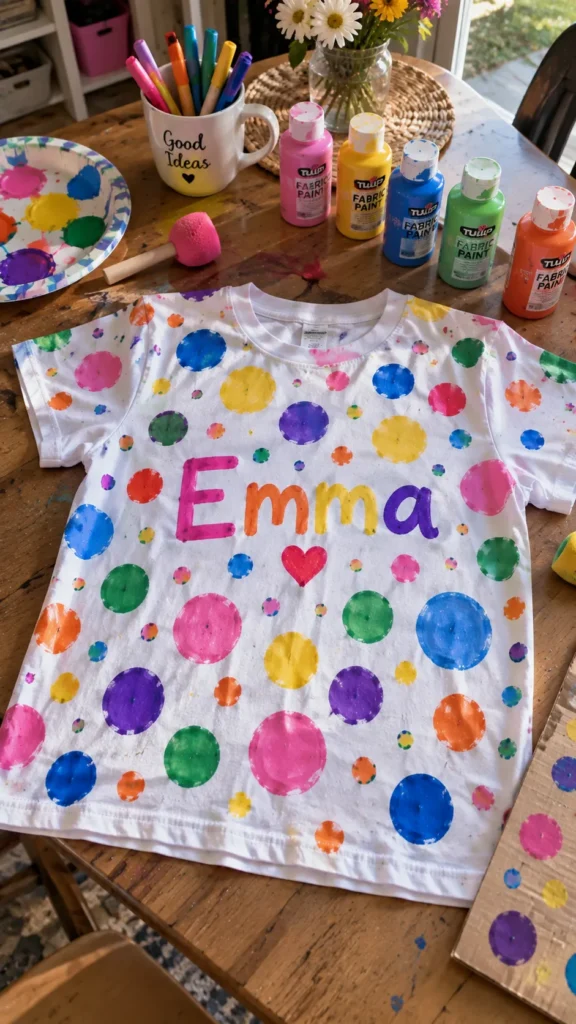
Personalizing a Dot Day shirt with a name makes the project more meaningful while keeping the decoration simple. I recommend creating the name first and adding dots around it rather than trying to paint dots underneath lettering. This gives the lettering a cleaner outline and makes the finished shirt easier to read from a distance.
What It Is
A personalized shirt featuring a name surrounded by colorful Dot Day circles.
Supplies and Budget
- Plain T-shirt
- Fabric paint
- Letter stencils or fabric marker
- Round sponge daubers
- Cardboard
Budget: approximately $8–$16.
Tutorial how to make:
Place cardboard inside the shirt. Lightly mark the name placement, then apply the lettering using fabric paint or a fabric marker. Once dry, surround the name with colorful dots of different sizes. Keep several dots away from the letters so the name remains easy to read.
DIY Tip
If using stencils, secure them with painter’s tape. Fabric paint can easily seep underneath a loose stencil and create fuzzy letter edges.
5. Smiley Face Dot Shirt
Description
A smiley face made from colorful dots is playful enough for kids but can also be adapted for adults with a more minimal palette. Instead of painting a solid yellow circle, build the face from individual dots. This gives the design a fun handmade texture and fits naturally with the idea behind Dot Day.

What It Is
A cheerful smiley face created entirely from colorful painted circles.
Supplies and Budget
- Yellow fabric paint
- Black fabric paint
- Additional colorful paints
- Round sponge daubers
- Plain shirt
Budget: approximately $8–$15.
Tutorial how to make:
Sketch a very light circular guide. Fill the face with yellow dots, keeping them close enough together to form a recognizable shape. After the yellow dries, add two black dots for the eyes and a curved black mouth. Finish with a few colorful dots around the face.
DIY Tip
Let the yellow layer dry before adding black details. Applying dark paint too soon can cause the colors to blend and make the facial features look muddy.
6. Flower Dot Day Shirt
Description
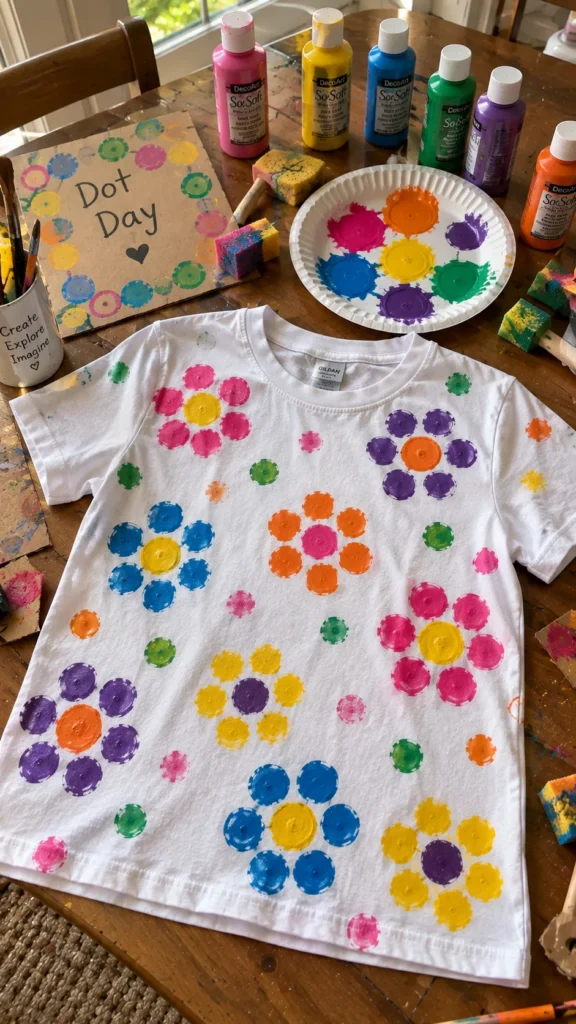
Flower shapes are surprisingly easy to create using dots, and they give a Dot Day shirt a more decorative look. I like using one larger center dot surrounded by smaller petals. Mixing several flower colors across the shirt creates a cheerful handmade pattern without requiring detailed painting skills.
What It Is
A floral shirt made from groups of colorful dots arranged like simple flowers.
Supplies and Budget
- Cotton T-shirt
- Fabric paints
- Small and medium round sponges
- Cardboard
- Pencil
Budget: approximately $8–$16.
Tutorial how to make:
Lightly mark where each flower will go. Make one large dot for the center and surround it with five or six smaller dots for petals. Repeat with different color combinations, leaving enough space between flowers so the pattern remains clear.
DIY Tip
Use contrasting colors for the centers and petals. Similar shades can visually blend together once the paint dries.
7. Giant Polka Dot Shirt
Description
Large polka dots create a bold Dot Day shirt with very little work. This design works best when the dots are spread across the shirt rather than packed tightly together. I prefer using three or four colors because too many shades can make large dots compete with each other.

What It Is
A simple statement T-shirt covered with oversized colorful polka dots.
Supplies and Budget
- Plain shirt
- Fabric paint
- Large round sponge
- Cardboard
- Small ruler
Budget: approximately $7–$15.
Tutorial how to make:
Place cardboard inside the shirt and lay it completely flat. Use a large sponge to stamp circles across the front, alternating colors and leaving irregular spaces between them. Check the shirt from a distance before adding any final dots.
DIY Tip
Do not stamp the same amount of paint onto every circle. Slight variations make the finished shirt look handmade instead of machine printed.
8. Dot Rainbow Heart Shirt
Description
A heart made from rainbow-colored dots creates a sweet design without complicated painting. Rather than filling the heart with solid color, use individual circles that gradually change from one shade to another. This technique is forgiving because small imperfections simply become part of the handmade pattern.

What It Is
A heart-shaped design built from colorful dots arranged in rainbow order.
Supplies and Budget
- Plain T-shirt
- Rainbow fabric paints
- Small round sponge
- Pencil
- Cardboard
Budget: approximately $10–$18.
Tutorial how to make:
Lightly draw a heart outline. Starting at the top, fill the shape with rows of colored dots, gradually moving through the rainbow palette. Keep the dots slightly irregular and erase or cover any visible pencil marks only after the paint has dried.
DIY Tip
Avoid filling the heart too densely. Small spaces between dots help the individual colors remain visible and prevent the design from becoming one solid mass.
9. Mixed Size Dot Shirt
Description
Using several dot sizes creates one of the easiest ways to make a plain shirt look professionally planned while keeping the process completely beginner-friendly. I like combining large circles with tiny dots because the difference in scale gives the design movement and prevents it from looking like a repetitive stamp pattern.

What It Is
A colorful shirt featuring large, medium, and tiny dots scattered across the fabric.
Supplies and Budget
- Plain T-shirt
- Fabric paints
- Several round sponge sizes
- Cardboard
- Paint palette
Budget: approximately $8–$17.
Tutorial how to make:
Choose three to five paint colors and several sponge sizes. Start with the largest circles, then fill empty spaces with medium and small dots. Step back occasionally to check the balance and stop before every empty area is covered.
DIY Tip
Leave some blank fabric visible. Negative space makes the colorful dots stand out and keeps the shirt comfortable to look at.
10. Black and White Dot Shirt
Description
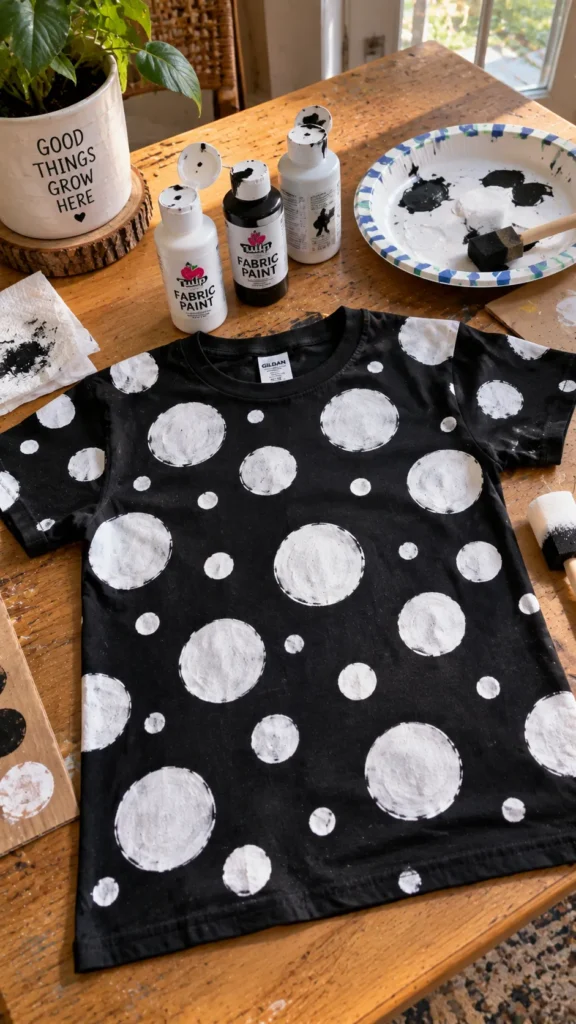
Dot Day does not have to mean using every color in the paint box. A black-and-white version feels modern and works well for older kids, teens, or adults. I recommend using different dot sizes to add interest because the limited color palette depends more heavily on shape and spacing.
What It Is
A minimalist Dot Day shirt decorated with black and white circles in different sizes.
Supplies and Budget
- White or black T-shirt
- Black or white fabric paint
- Round sponges
- Cardboard
- Optional fabric marker
Budget: approximately $6–$14.
Tutorial how to make:
Insert cardboard into the shirt and decide whether you want a scattered or clustered design. Stamp large circles first, followed by smaller dots. If using a dark shirt, allow the first layer of white paint to dry before applying a second coat.
DIY Tip
For white paint on dark fabric, two thin coats usually look cleaner than one very thick coat.
11. “Be the Dot” Shirt
Description
This idea turns Dot Day into a simple inspirational shirt while keeping the artwork colorful. The phrase becomes the main feature, and small dots provide a playful border around it. I recommend using a stencil or transfer method for the lettering if you want clean results, especially when working with a detailed phrase.

What It Is
A motivational Dot Day shirt featuring the phrase “Be the Dot” surrounded by colorful circles.
Supplies and Budget
- Plain T-shirt
- Fabric paint
- Letter stencil
- Round sponge
- Painter’s tape
- Cardboard
Budget: approximately $8–$18.
Tutorial how to make:
Position the phrase in the center and secure the stencil. Apply fabric paint lightly and remove the stencil while the paint is still slightly wet. After the lettering dries, add colorful dots around the words without touching the letters.
DIY Tip
Do a practice version of the lettering on scrap fabric first. It is much easier to fix stencil pressure and paint quantity before working on the actual shirt.
12. Hand-Printed Dot Shirt
Description
For the most genuinely handmade look, use your fingertips or simple household objects to create the dots. Bottle caps, pencil erasers, cotton swabs, and sponge pieces can all produce different textures. The small variations make every shirt unique and are especially fun when several people make their own shirts together.

What It Is
A completely handmade Dot Day shirt using simple household objects to create colorful prints.
Supplies and Budget
- Plain cotton T-shirt
- Fabric paint
- Bottle caps
- Pencil eraser
- Cotton swabs
- Cardboard
Budget: approximately $5–$12.
Tutorial how to make:
Wash the shirt first and place cardboard inside. Dip the chosen household object lightly into fabric paint and press it straight onto the fabric. Experiment with different objects to create different dot sizes and textures. Let the shirt dry completely before wearing or washing.
DIY Tip
Test every object on scrap fabric first. Some surfaces release too much paint and create raised, messy circles, while others produce a much cleaner print.
FAQ SECTION
What type of shirt is best for Dot Day?
A cotton or cotton-blend T-shirt is usually easiest to decorate. Light colors make bright fabric paint especially visible, while darker shirts may require additional coats.
Do I need special fabric paint?
Fabric paint is the safest choice for a washable shirt because it is designed to bond with fabric. Regular acrylic paint can become stiff or crack unless it is specifically mixed with an appropriate fabric medium.
Should I wash the shirt before decorating it?
Yes. Washing removes manufacturing finishes that can prevent paint from adhering properly. Avoid fabric softener because it can leave a coating on the fibers.
How do I stop paint from bleeding through the shirt?
Always place a piece of cardboard inside the shirt before painting. Keep the cardboard flat and use controlled amounts of paint rather than soaking the fabric.
How long should a Dot Day shirt dry?
Drying time depends on the fabric paint and how thickly it was applied. Follow the manufacturer’s instructions and give the design plenty of time to cure before washing.
Can I make these shirts without a cutting machine?
Yes. Most of these designs only require sponges, fabric paint, simple stencils, or household objects. A cutting machine is helpful for detailed lettering but is not necessary.
How should I wash a handmade Dot Day shirt?
Turn the shirt inside out and wash it according to the fabric paint manufacturer’s instructions. Using a gentle cycle and avoiding unnecessarily high heat can help preserve the design.
Can children make these Dot Day shirts?
Yes, many of these projects are suitable for children with adult supervision. Younger children can focus on stamping dots while an adult handles preparation, drying, and cleanup.
RELATED CONTENT
CLOSING
I love Dot Day projects because they prove that a great DIY does not need complicated supplies or perfect technique. A plain shirt, a few colors of fabric paint, and some simple dot-making tools can turn into something completely personal.
The little imperfections are part of the fun, too. Whether you choose a colorful confetti design, a rainbow heart, a simple name shirt, or a completely handmade print, make it your own and enjoy the process. Try one of these Dot Day shirt ideas, experiment with your favorite colors, and share how your finished shirt turned out.