12 Curly Slick Back Hairstyles That Look Chic and Polished
Curly Slick Back Hairstyles
Curly slick back hairstyles are a great way to keep natural curls defined while creating a polished, pulled-back look.
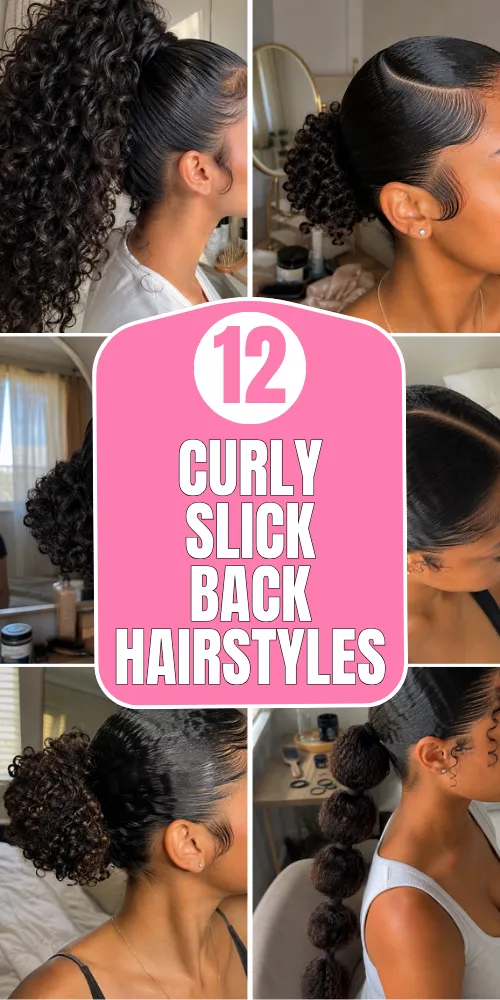
The key is not simply brushing everything backward. You need to work with your curl pattern, choose the right amount of product, and control the hairline without flattening the texture you want to keep visible.
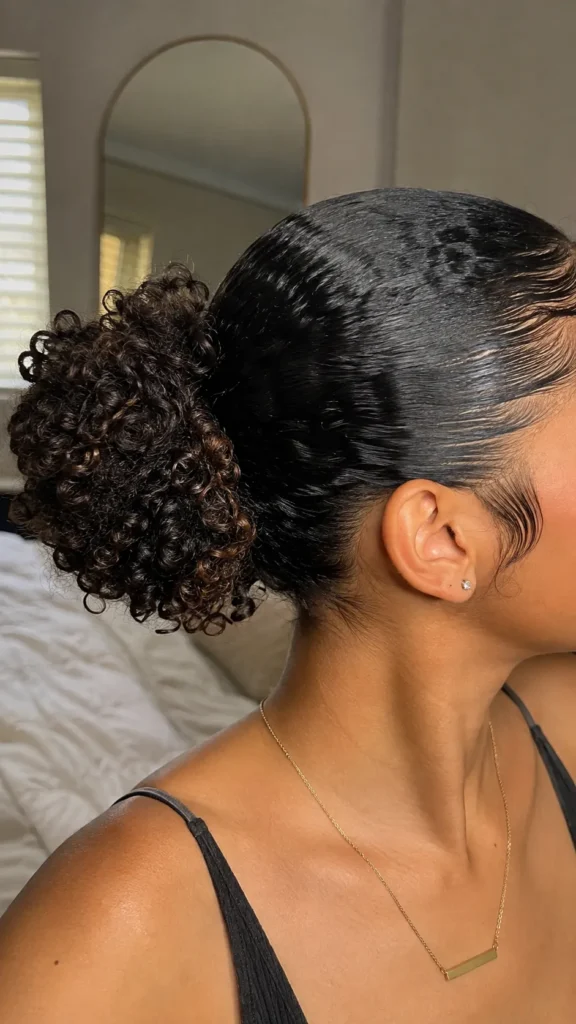
1. Glossy Curly Slick Back Bun
Description
A glossy curly slick back bun combines a smooth front with curls gathered neatly into a compact bun. It works especially well when you want a polished style without completely hiding your natural texture. The biggest difference between a clean result and a messy one is controlling the hairline before securing the bun.
How-To
Start with slightly damp hair and apply a lightweight leave-in conditioner. Smooth styling gel through the front and sides, brushing the hair backward with a firm but gentle brush. Secure the ponytail at the desired height, twist the curly length into a bun, and pin it securely.
Tips
Use gel in thin layers instead of applying a large amount at once. If your curls are dense, divide the back section before twisting so the bun stays compact.
Items Used
- Leave-in conditioner
- Strong-hold styling gel
- Smoothing brush
- Hair tie
- Bobby pins
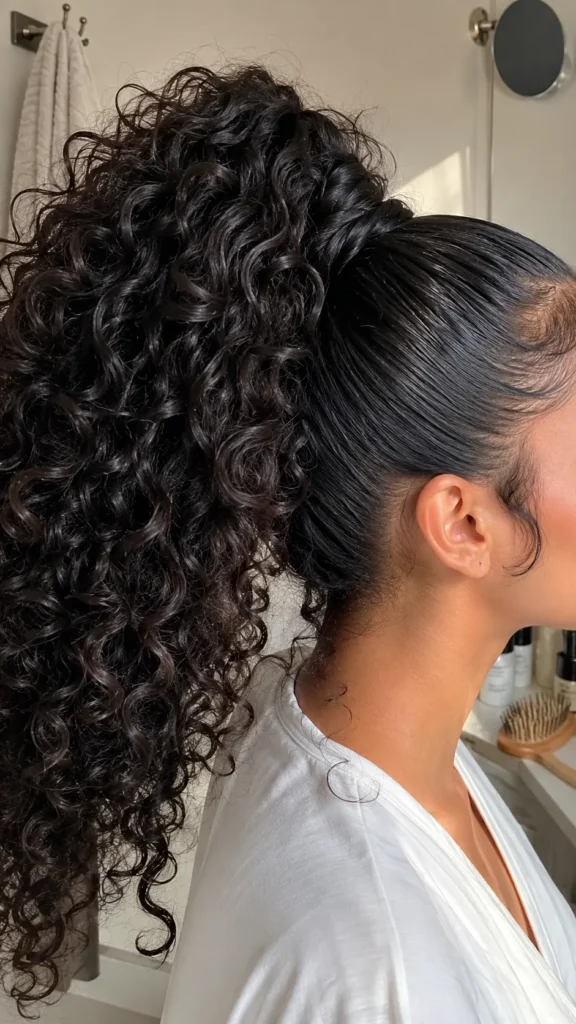
2. Curly Slick Back High Ponytail
Description
A high curly slick back ponytail gives the face an instantly lifted appearance while allowing the curls to remain full and visible. This style works best when the crown is smooth but the ponytail retains its natural volume. Avoid brushing the curls themselves too aggressively, as this can create unnecessary frizz.
How-To
Apply curl cream through the lengths and gel around the roots. Brush the front, sides, and crown toward the highest point of the head. Secure the ponytail tightly, then refresh the curls in the ponytail with a small amount of curl-defining product.
Tips
Use a strong elastic that will not loosen under the weight of thick curls. Wrap a small curl around the elastic for a more finished appearance.
Items Used
- Curl cream
- Styling gel
- Detangling brush
- Strong hair elastic
- Edge brush
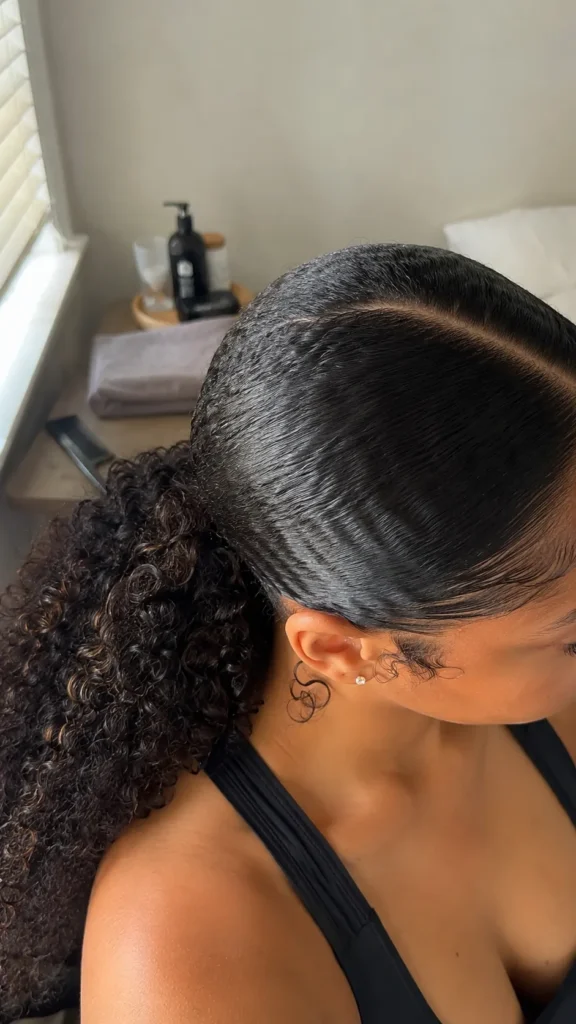
3. Middle-Part Curly Slick Back
Description
A middle-part slick back is ideal when you want a structured hairstyle that still highlights your natural curls. The center part creates symmetry, while the slicked sides keep the style controlled. It is especially flattering when the part is clean and the product is concentrated near the roots rather than throughout the curls.
How-To
Create a precise center part using a tail comb. Apply gel along both sides of the part and brush the hair backward toward a low ponytail. Secure the ponytail at the nape, then allow the curly ends to remain loose or twist them into a small bun.
Tips
Create the part before applying heavy product. This prevents the comb from disturbing the finished surface and helps maintain a sharper line.
Items Used
- Tail comb
- Styling gel
- Smoothing brush
- Hair elastic
- Light curl cream
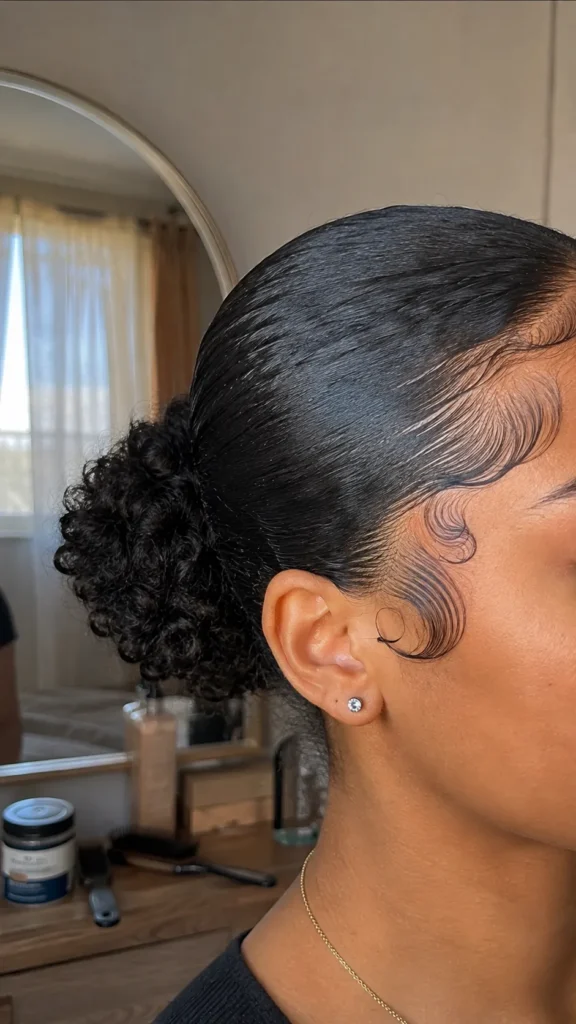
4. Curly Slick Back With Defined Edges
Description
Defined edges can give a simple curly slick back hairstyle a much more intentional finish. Instead of creating complicated patterns, focus on a few clean curves that follow your natural hairline. This works particularly well when the rest of the hairstyle is pulled into a simple ponytail or bun.
How-To
Smooth the main hair backward using gel and a soft-bristle brush. Leave a small amount of hair around the hairline free. Use an edge brush and a small quantity of edge control to shape the edges into gentle curves, then secure the remaining hair.
Tips
Less product usually gives better edges. Too much edge control can leave buildup and make the hairline look stiff instead of polished.
Items Used
- Edge control
- Edge brush
- Styling gel
- Soft-bristle brush
- Satin scarf
5. Low Curly Slick Back Ponytail
Description
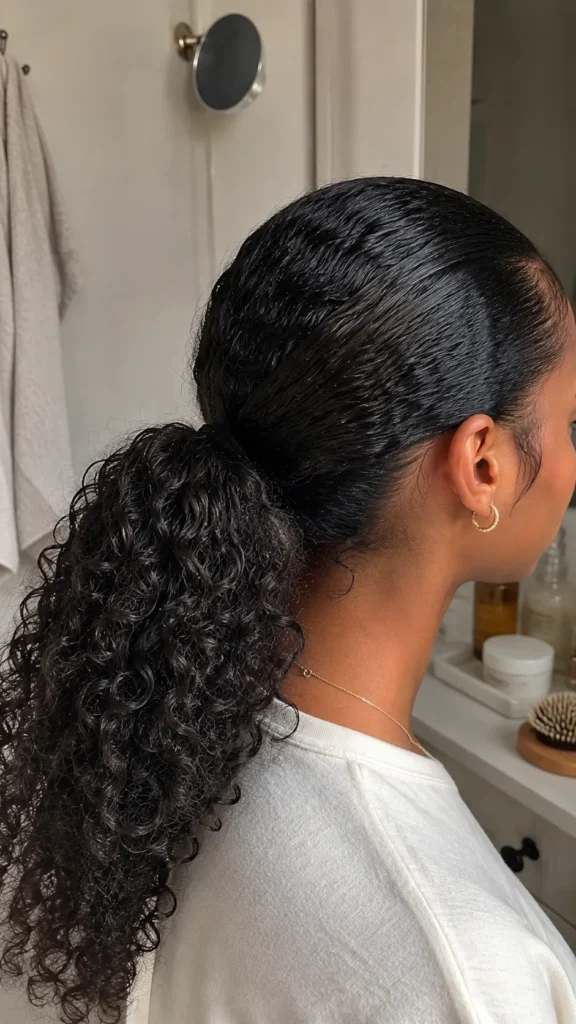
The low curly slick back ponytail is simple, elegant, and practical for everyday wear. Keeping the ponytail close to the nape creates a softer silhouette than a high ponytail while allowing the natural curl pattern to provide volume. It is also easier to maintain when your curls are longer or heavier.
How-To
Apply leave-in conditioner to damp hair, then smooth gel through the roots and sides. Brush everything backward toward the nape and secure it firmly. Use curl cream or mousse on the ponytail to encourage definition without weighing down the curls.
Tips
Do not pull the ponytail excessively tight if you plan to wear it for several hours. A secure but comfortable hold will help prevent unnecessary tension around the hairline.
Items Used
- Leave-in conditioner
- Styling gel
- Curl mousse
- Brush
- Hair elastic
6. Curly Slick Back With Loose Tendrils
Description
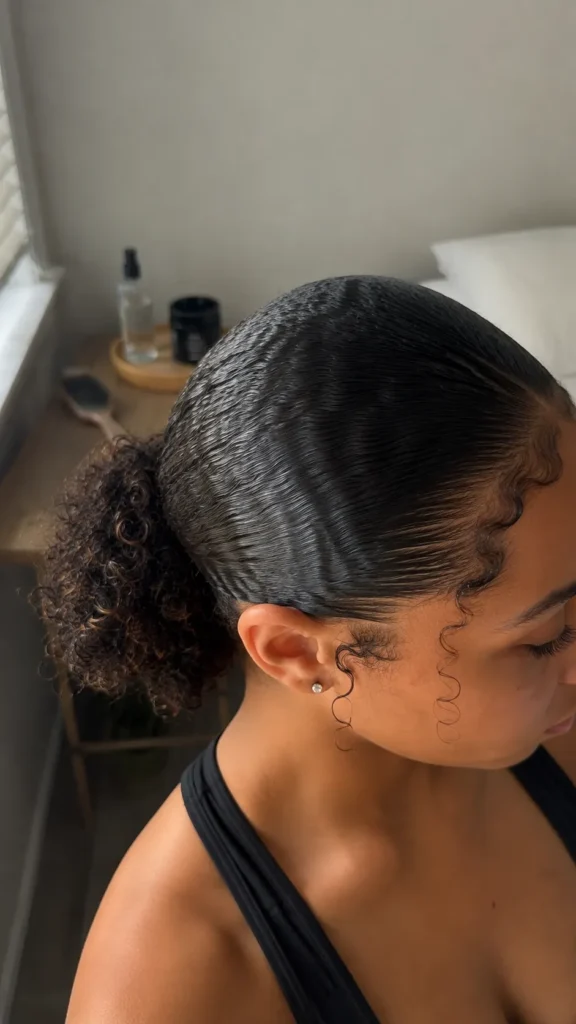
Loose tendrils soften the structured appearance of a slick back hairstyle while keeping the overall look polished. The trick is choosing only a few intentional curls around the face rather than pulling out too many pieces. This style works beautifully when the tendrils closely match the natural curl pattern.
How-To
Slick the main hair backward into a low or medium ponytail. Before securing the style, gently pull out two or three small curls near the temples and front hairline. Apply a tiny amount of curl gel to define them and allow them to dry naturally.
Tips
Choose curls that already have a good shape. Trying to create tendrils from brushed-out sections can produce frizz and make the hairstyle look less intentional.
Items Used
- Curl gel
- Leave-in conditioner
- Smoothing brush
- Hair tie
- Small curling tool if needed
7. Side-Part Curly Slick Back Bun
Description
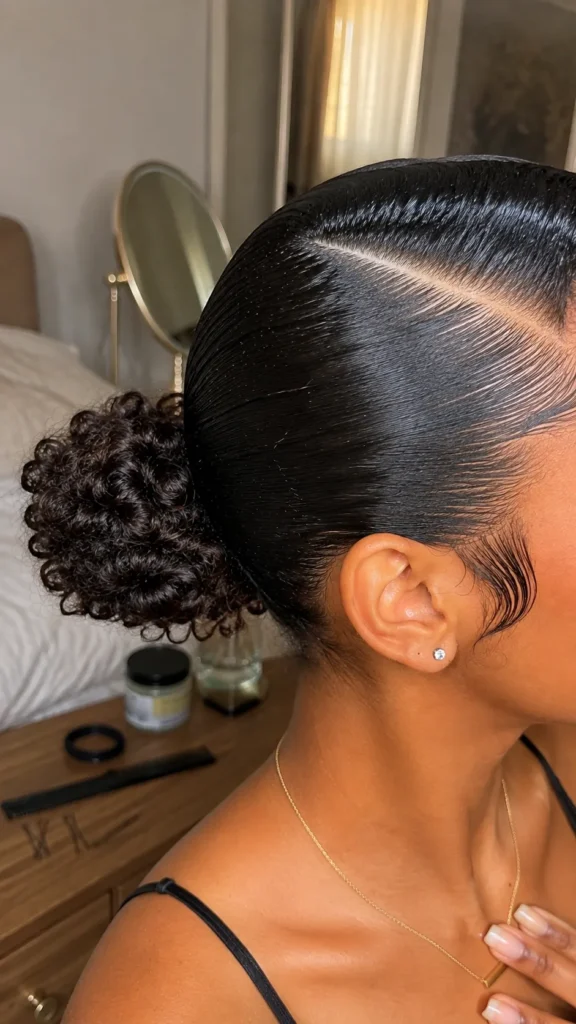
A deep side part changes the entire appearance of a classic slick back bun. It adds asymmetry and creates a more sophisticated shape around the face. The style is especially effective when the part is sharply defined and the bun remains smooth and compact.
How-To
Create a deep side part with a tail comb. Apply styling gel to the roots and brush both sections backward toward the nape. Secure the hair into a low ponytail, twist the curls into a bun, and pin the shape underneath.
Tips
Keep the side part visible instead of covering it with product. For thick curly hair, use several small pins around the bun rather than relying on one large pin.
Items Used
- Tail comb
- Styling gel
- Smoothing brush
- Hair elastic
- Bobby pins
8. Curly Slick Back Half-Up Style
Description
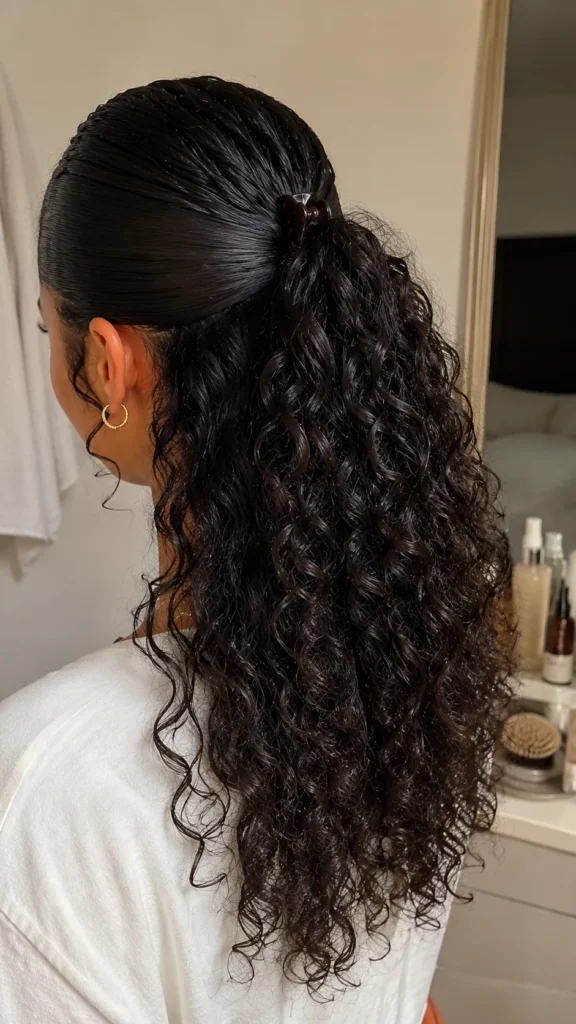
A half-up curly slick back gives you the controlled appearance of a slicked hairstyle without pulling all of the curls away from the face. It is a useful option when you want to showcase your curl pattern while keeping the front section neat. The contrast between smooth roots and loose curls makes the style visually interesting.
How-To
Separate the hair from temple to temple and gather the upper section. Apply gel to the roots and smooth the section backward. Secure it at the crown with a small elastic or claw clip, then define the remaining curls with curl cream.
Tips
Avoid making the upper section too large. Keeping the gathered portion moderate gives the hairstyle better balance and prevents the crown from looking overly flat.
Items Used
- Curl cream
- Styling gel
- Small elastic
- Smoothing brush
- Wide-tooth comb
9. Curly Slick Back With Bubble Ponytail
Description
A bubble ponytail gives a traditional slick back a playful but structured update. The smooth roots create a clean foundation while several secured sections add shape to the curly ponytail. It is particularly useful for longer curls because the sections help control excess length without hiding the texture completely.
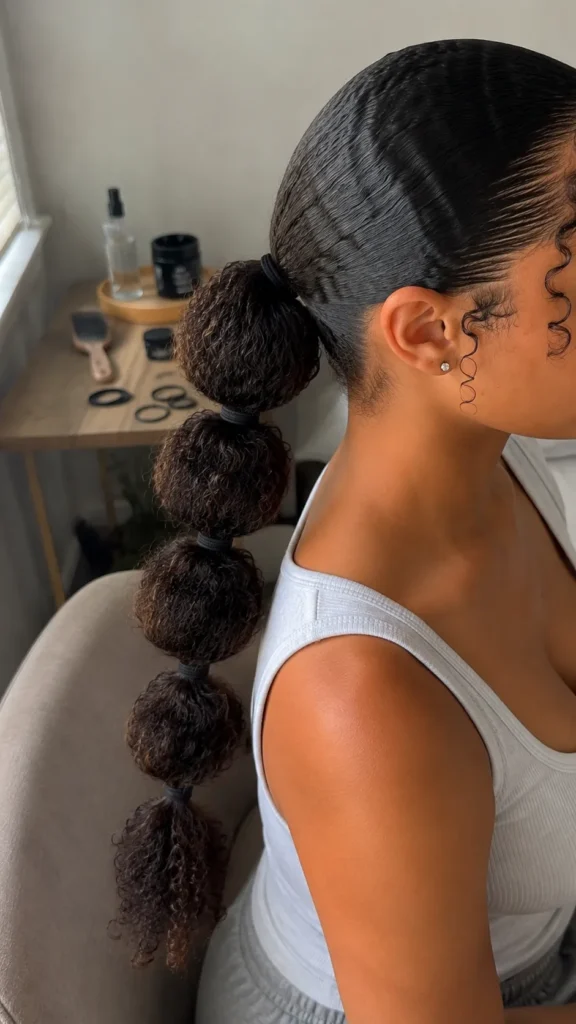
How-To
Slick the hair into a high or low ponytail and secure it firmly. Place additional small elastics down the length of the ponytail at even intervals. Gently pull each section outward to create rounded bubbles while preserving as much curl definition as possible.
Tips
Leave enough space between elastics for the bubbles to form naturally. Pull gently rather than aggressively, especially when working with fragile curls.
Items Used
- Styling gel
- Smoothing brush
- Strong hair elastic
- Small clear elastics
- Curl refresher
10. Curly Slick Back With Sculpted Front
Description
A sculpted front gives the curly slick back a more editorial appearance while keeping the rest of the hairstyle simple. Instead of completely flattening the front, shape it into a controlled curve before pulling the remaining hair backward. This works best when the front section has enough product to hold its shape without becoming flaky.
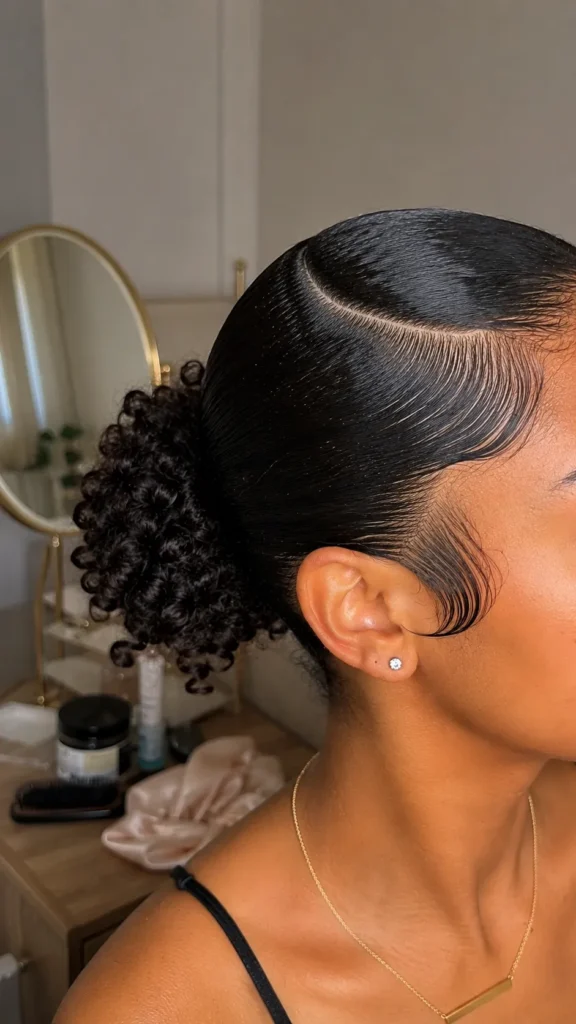
How-To
Apply gel to the front section and use a small comb to guide the hair backward into a smooth curved shape. Secure the rest into a low ponytail or bun. Once the front is positioned, leave it untouched while the product sets.
Tips
Choose a flexible styling gel if your hair tends to become hard or flaky. A satin scarf worn for several minutes can help the shape set more evenly.
Items Used
- Flexible styling gel
- Fine-tooth comb
- Satin scarf
- Hair elastic
- Edge brush
11. Voluminous Curly Slick Back Ponytail
Description
This version keeps the roots sleek while deliberately preserving maximum volume in the ponytail. It is a strong choice for dense curls because the contrast between the smooth crown and full ponytail creates a balanced silhouette. The goal is controlled roots, not a completely flat hairstyle.
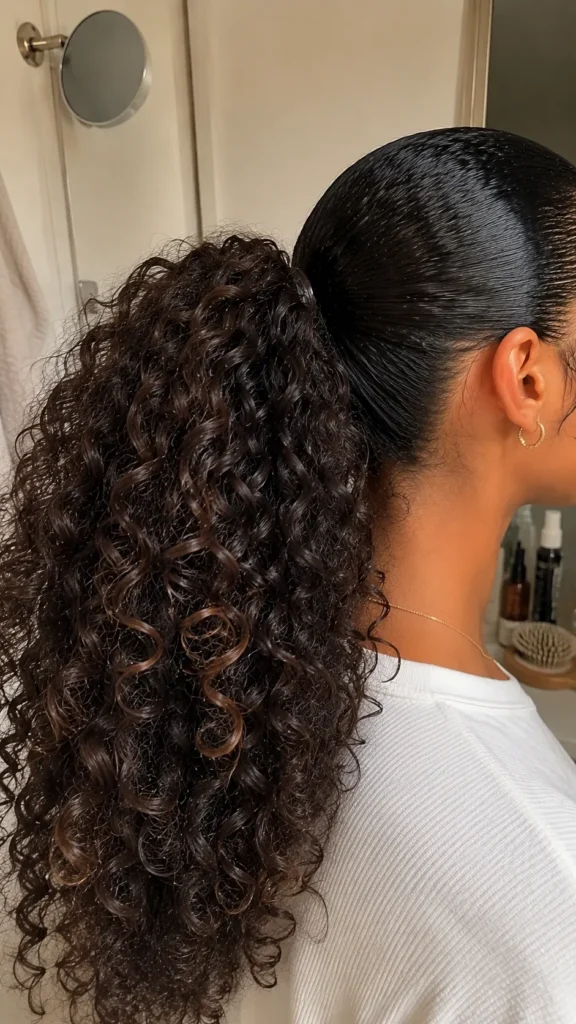
How-To
Smooth only the root area with gel, leaving the lengths mostly untouched. Gather the hair into a high or medium ponytail and secure it firmly. Refresh the curls with mousse or curl cream, then separate a few curls with your fingers to restore volume.
Tips
Do not apply heavy gel to the entire ponytail. Too much product can weigh down the curls and remove the volume that makes this style work.
Items Used
- Styling gel
- Curl mousse
- Leave-in conditioner
- Smoothing brush
- Strong hair tie
12. Curly Slick Back With Mini Twisted Bun
Description
A mini twisted bun creates a neat, understated finish while keeping the slick back hairstyle comfortable and practical. It works particularly well for medium-length curls that may not have enough length for a large bun. Keeping the twist compact prevents loose curls from escaping around the nape.
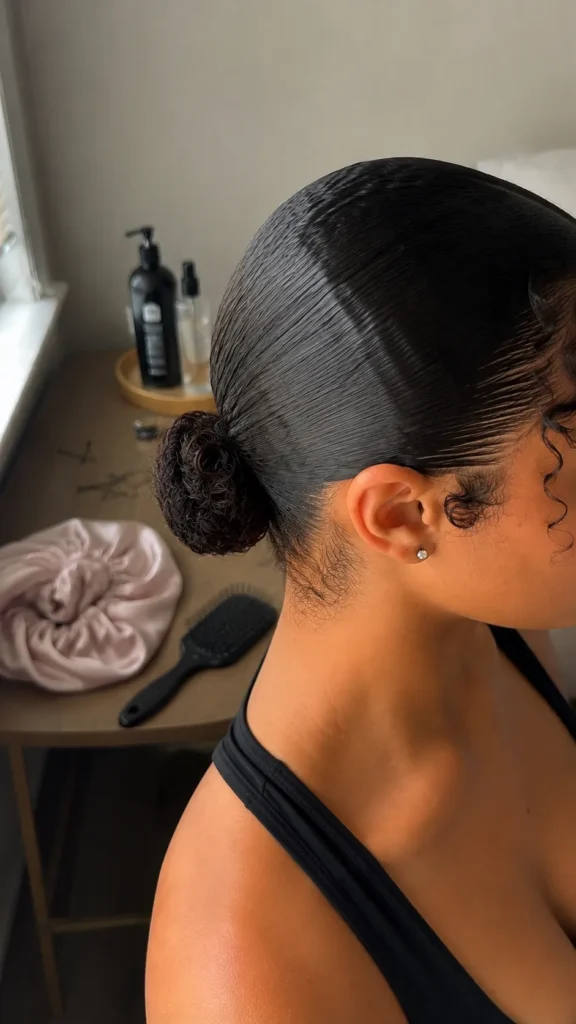
How-To
Smooth the hair backward with gel and gather it into a low ponytail. Divide the ponytail into two sections, twist them together, and wrap the twist around the base. Secure the bun with bobby pins, then smooth any loose areas around the hairline.
Tips
Twist the hair firmly enough to hold the shape but do not pull excessively at the roots. If your curls are very thick, use multiple pins around the base for better support.
Items Used
- Styling gel
- Leave-in conditioner
- Smoothing brush
- Hair elastic
- Bobby pins
- Edge brush
FAQ SECTION
Can curly hair be slicked back without losing curl definition?
Yes. The easiest approach is to use strong-hold product mainly on the roots and hairline while using curl cream or mousse on the lengths. This keeps the pulled-back areas controlled without coating the curls in heavy gel.
What product is best for a curly slick back?
A strong but flexible styling gel is usually the most versatile choice. For the hairline, a small amount of edge control can provide extra precision. Avoid layering too many products because buildup can make curls look dull or flaky.
How can I prevent a slick back from looking greasy?
Use product sparingly and distribute it with a damp brush rather than applying a large amount directly to the hair. A lightweight leave-in conditioner underneath can also help reduce the need for excessive gel.
Are slick back hairstyles suitable for thick curly hair?
Absolutely. Thick curls often hold slick back styles well, but sectioning is important. Working in smaller sections makes it easier to control the roots and prevents uneven areas.
How can I make a curly slick back last longer?
Start with well-prepped hair, use a reliable styling product, and allow the style to set before touching it. Wrapping the hair with a satin scarf while the product dries can also help keep the surface smooth.
RELATED CONTENT
CLOSING
Curly slick back hairstyles do not have to mean sacrificing your natural texture. The best results come from finding the right balance between smooth roots, defined curls, and a style that feels comfortable enough to actually wear. Whether you prefer a simple low ponytail, a polished bun, or a more creative bubble ponytail, these ideas can be adapted to different curl patterns and hair lengths.
Start with the style that feels closest to your everyday routine, then experiment with your part, edges, volume, and accessories. With a little practice, you can make a slick back work with your curls instead of fighting against them.
I hope these ideas inspire you to try something new and make the style your own. Try your favorite look, take a photo of your finished hairstyle, and share your results.