12 Scrap Wood Christmas Tree Ideas for Rustic Holiday Decor

Scrap Wood Christmas Tree
Scrap wood is one of my favorite materials for creating Christmas decorations because it gives ordinary leftover pieces a second life. If you have a few wooden boards, old pallet pieces, or small offcuts sitting in your garage, you can turn them into charming Christmas trees without spending much money. The best part is that these projects do not need to look perfectly polished. A little variation in wood grain, paint, and shape gives each handmade tree its own personality.

Whether you love rustic farmhouse decorations, colorful holiday crafts, or simple natural wood accents, there is an idea here to suit your home. Some projects are small enough for a shelf or tabletop, while others make beautiful statement pieces for a porch or living room. Before starting, check that your wood is clean, dry, and free from nails, sharp splinters, or signs of rot. With a few basic tools and some creativity, leftover wood can become a collection of decorations you will enjoy bringing out every Christmas.
1. Rustic Scrap Wood Christmas Tree with Layered Branches
Description
Create a traditional rustic Christmas tree using short scrap wood pieces arranged in layers along a central wooden support. The natural grain and slightly uneven edges give this decoration a cozy handmade appearance that works beautifully on a mantel, console table, or farmhouse-style shelf.

What It Is
This is a freestanding wooden tree made by attaching horizontal wood strips to a vertical center piece. The strips become gradually shorter toward the top, creating a simple triangular Christmas tree silhouette. You can leave the wood natural, stain it, or add a light whitewashed finish.
Supplies and Budget
- Scrap wood strips in different lengths: free–$5
- One narrow wooden board for the center support: $2–$4
- Wood glue and small screws: $3–$6
- Sandpaper: $2–$3
- Wood stain or paint: $3–$6
Estimated budget: $10–$24, depending on what you already own.
Tutorial how to make:
- Cut several wood strips into different lengths, starting with the longest at the bottom and gradually shortening them toward the top.
- Sand every piece, paying particular attention to rough corners and splintered edges.
- Lay the strips out on a flat surface to test the tree shape before attaching anything.
- Position the vertical support behind the strips and mark the center of each branch.
- Attach the strips using wood glue and suitable screws. Pre-drill holes near the ends if the wood is thin to reduce splitting.
- Allow the glue to dry, then add stain, paint, or a clear protective finish.
- Add a small wooden star at the top if you want a traditional finishing detail.
DIY Tip
Do not make every branch perfectly aligned. Slight differences in spacing and wood length make the tree look more authentic. However, keep the center support straight so the finished decoration remains balanced.
2. Mini Scrap Wood Christmas Trees for Shelves
Description
Turn small leftover wood blocks into charming miniature Christmas trees for shelves, desks, and windowsills. These little decorations are easy to customize with paint, simple wooden details, and natural finishes, making them a lovely project when you have only a handful of small offcuts available.

What It Is
These are small decorative trees made from triangular wood pieces attached to flat wooden bases. You can create a matching group in different heights or decorate each one in a different Christmas color for a playful display.
Supplies and Budget
- Small scrap wood pieces: free
- Thin wood board for tree shapes: $2–$4
- Wooden blocks for bases: $1–$3
- Acrylic paint or wood stain: $3–$5
- Wood glue and sandpaper: $3–$5
Estimated budget: $9–$17.
Tutorial how to make:
- Select thin pieces of wood that are large enough to cut into small triangular shapes.
- Draw several tree outlines using a pencil and ruler. Make different heights so the group looks interesting.
- Carefully cut the shapes using a jigsaw or have a suitable workshop cut them for you.
- Sand the edges until they feel smooth, especially around the pointed tops.
- Paint each tree in green, cream, white, or muted red, or leave some pieces natural.
- Attach each tree to a small flat wooden base with wood glue. Check that it stands upright before the glue dries.
- Add small painted dots, tiny stars, or miniature wooden ornaments.
DIY Tip
A wide, flat base is more important than making the tree heavy. If your tree keeps falling over, enlarge the base rather than adding unnecessary decorations to the top.
3. Scrap Wood Christmas Tree with a Whitewashed Finish
Description
Give leftover wood a soft winter appearance with a simple whitewashed finish. This tree combines visible natural wood grain with pale white paint, creating a relaxed Christmas decoration that looks beautiful alongside greenery, candles, and neutral holiday accessories.

What It Is
A layered wooden Christmas tree made from horizontal boards, finished with diluted white paint so the wood grain remains visible. It is especially suitable for farmhouse, Scandinavian-inspired, or neutral Christmas decorating.
Supplies and Budget
- Scrap wood boards: free–$5
- White acrylic or chalk-style paint: $3–$6
- Water and a mixing container: $1
- Sandpaper: $2–$3
- Wood glue and screws: $3–$5
- Clear matte sealer: $3–$5
Estimated budget: $12–$25.
Tutorial how to make:
- Cut the wood into several horizontal pieces of gradually decreasing length.
- Sand the boards to remove splinters while keeping some natural texture.
- Mix white paint with a little water, starting with a thin mixture.
- Brush a small amount onto one board and wipe it back with a clean cloth before it dries completely.
- Repeat until the wood has a soft, uneven whitewashed appearance.
- Let all pieces dry fully before assembling the tree on a central wooden support.
- Apply a clear matte sealer if the decoration will be handled frequently.
DIY Tip
Test your whitewash on the back of a scrap piece first. Too much paint can cover the grain completely, while too much water can make the finish patchy and difficult to control.
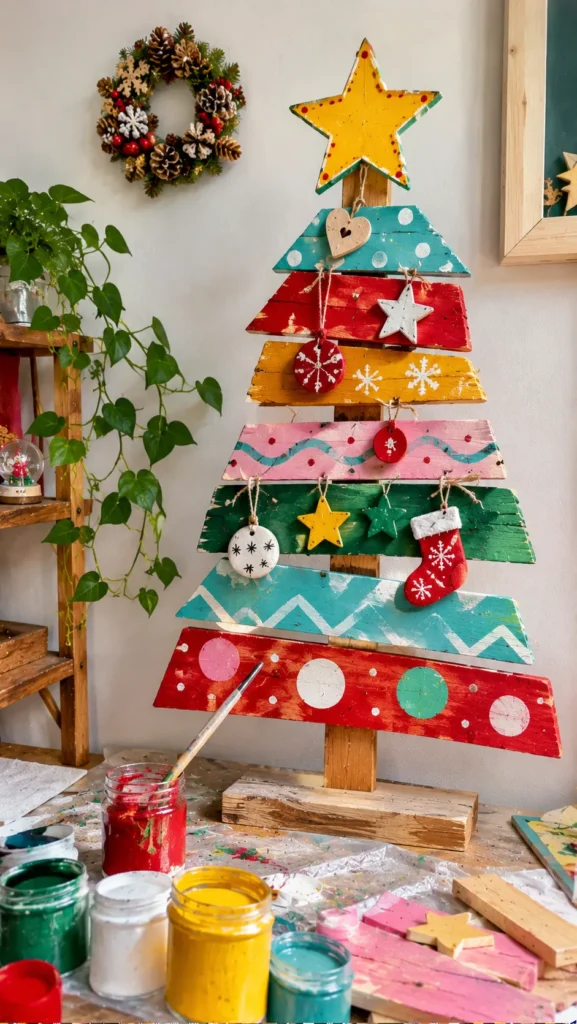
4. Colorful Painted Scrap Wood Christmas Tree
Description
Bring a cheerful pop of color to your holiday decorations with a scrap wood tree painted in bright Christmas shades. Mix traditional green and red with blue, yellow, pink, or white details to create a playful handmade decoration that feels personal rather than store-bought.
What It Is
A wooden Christmas tree assembled from leftover boards or a single cut-out wood panel, then decorated with colorful paint. You can choose a neat painted pattern or let every wooden section have its own color.
Supplies and Budget
- Scrap wood: free–$5
- Acrylic paints in your chosen colors: $5–$10
- Paintbrushes: $2–$4
- Sandpaper: $2–$3
- Wood glue or screws: $3–$5
- Clear protective finish: $3–$5
Estimated budget: $15–$32.
Tutorial how to make:
- Choose whether you want a layered tree made from separate boards or one triangular wooden panel.
- Cut and sand the pieces, removing rough corners and loose splinters.
- Apply a suitable primer if the wood is very porous or has an uneven old finish.
- Paint the tree sections in different colors, allowing each layer to dry before adding another.
- Use a small brush to add simple ornaments, dots, stripes, or stars.
- Assemble the tree if you are using separate pieces, securing everything firmly.
- Finish with a protective coating suitable for the paint you used.
DIY Tip
Use two thin coats of paint instead of one thick coat. Thick paint can leave brush marks, hide the wood texture, and take much longer to dry.
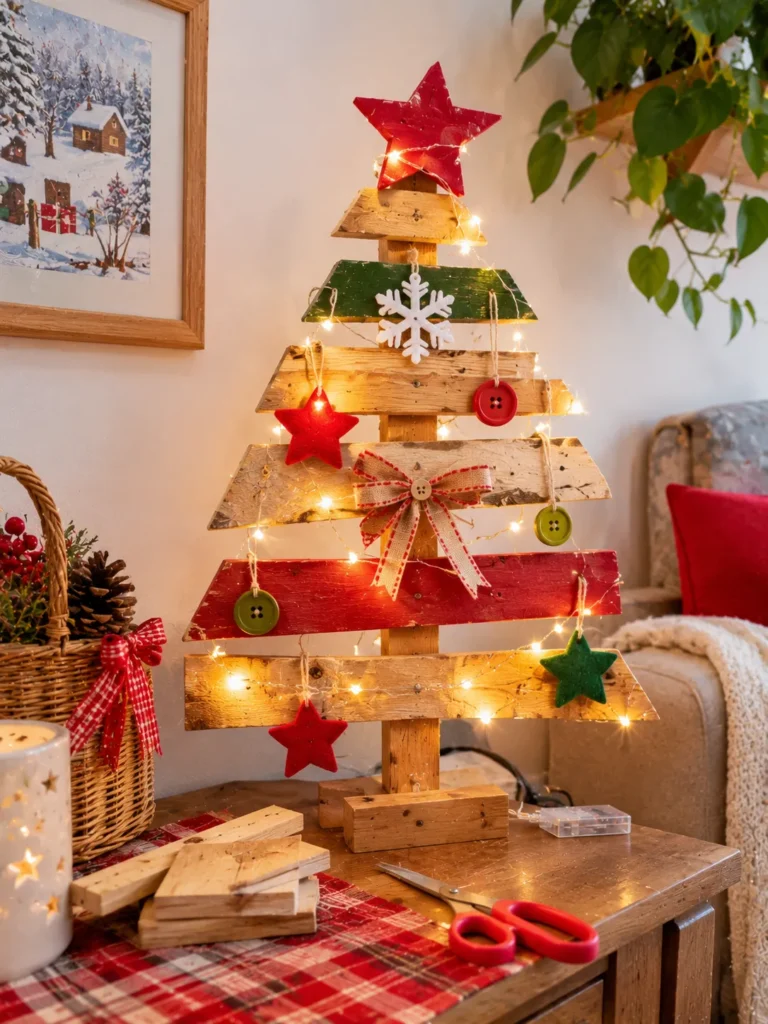
5. Scrap Wood Christmas Tree with String Lights
Description
Make a simple wooden Christmas tree glow with a short strand of warm white lights. The combination of natural wood and soft lighting creates a cozy decoration for an entryway, bedroom, or living room, especially when you want something festive without a full-size tree.
What It Is
This project uses scrap wood arranged into a tree silhouette, with battery-operated lights attached along the edges or front. It can be designed as a freestanding tabletop decoration or a larger wall-mounted feature.
Supplies and Budget
- Scrap wood strips: free–$5
- Small wooden support or backing board: $2–$4
- Battery-operated LED string lights: $5–$10
- Wood glue and screws: $3–$5
- Sandpaper and finish: $3–$6
Estimated budget: $13–$30.
Tutorial how to make:
- Arrange the wood strips into a triangular tree shape, using shorter pieces toward the top.
- Attach the strips to a backing board or central support, making sure the structure is stable.
- Sand the edges and apply a natural stain or paint if desired.
- Test the LED lights before attaching them.
- Wrap the lights loosely around the tree, distributing them evenly without pulling the wire tightly.
- Secure the wire with suitable small clips, keeping the battery compartment accessible.
- Switch on the lights and adjust any sections that look too crowded or uneven.
DIY Tip
Use battery-operated LED lights that stay cool during operation. Keep the wire away from sharp wood edges, and never use damaged electrical strands or leave lighting unattended if the product instructions advise against it.
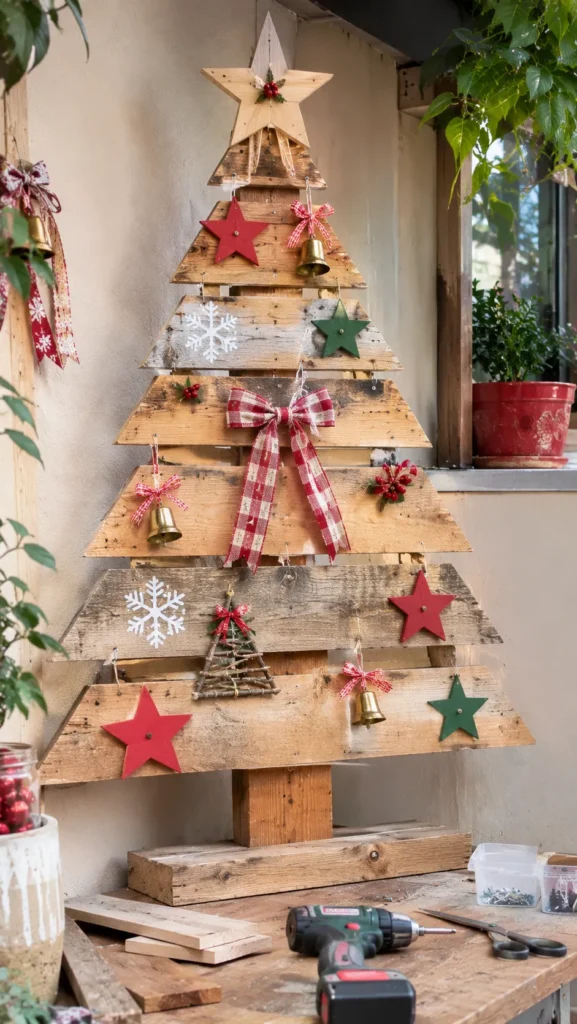
6. Reclaimed Pallet Wood Christmas Tree
Description
Give old pallet boards a festive new purpose by turning them into a rustic Christmas tree. The weathered wood, natural color differences, and visible grain create a unique decoration that works well in a farmhouse living room, covered porch, or holiday entryway.
What It Is
A larger Christmas tree made from reclaimed pallet boards arranged horizontally on a central support. Depending on the size, it can lean against a wall, stand on a base, or be mounted securely as a decorative feature.
Supplies and Budget
- Reclaimed pallet boards: free–$5
- Central support board: $2–$5
- Screws and wood glue: $3–$6
- Sandpaper: $2–$4
- Wood stain or outdoor-rated finish: $4–$8
Estimated budget: $11–$28.
Tutorial how to make:
- Choose clean, dry pallet wood with no signs of rot, chemical contamination, or pest damage. Avoid boards with unknown treatment or spills.
- Remove nails and staples carefully, then inspect each board for cracks.
- Cut the boards into progressively shorter lengths.
- Sand the surfaces and edges thoroughly, especially if the tree will be placed where people can touch it.
- Arrange the pieces on a central support and check the proportions before fastening.
- Secure the boards with screws, using pilot holes to help prevent splitting.
- Apply a suitable wood finish and allow it to dry according to the manufacturer’s instructions.
DIY Tip
Do not assume every pallet is safe to reuse indoors. Choose wood with a known, clean history, and avoid boards that are stained, oily, moldy, or chemically treated with an unknown product.
7. Scrap Wood Christmas Tree with Wooden Ornaments
Description
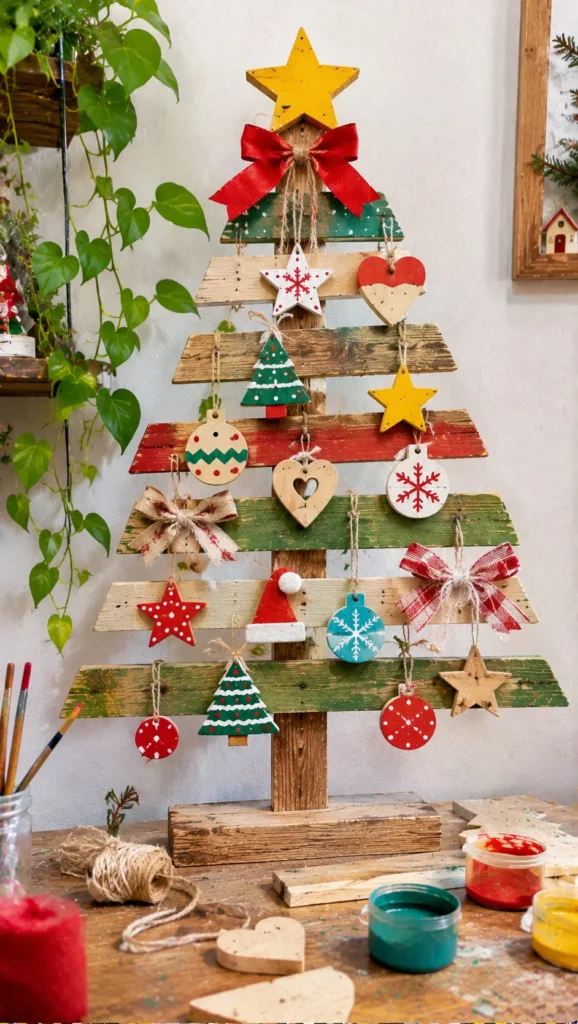
Create a handmade wooden tree and decorate it with tiny ornaments cut from leftover wood. This project is a lovely way to use even the smallest offcuts while building a coordinated Christmas decoration with natural textures and personalized details.
What It Is
A small or medium-sized wooden Christmas tree assembled from scrap boards and decorated with miniature wooden stars, circles, hearts, and other simple shapes. You can leave the ornaments natural or paint them in festive colors.
Supplies and Budget
- Scrap wood for the tree: free–$5
- Thin wood offcuts for ornaments: free
- Small saw and sandpaper: $3–$6 if needed
- Acrylic paint or stain: $3–$6
- Wood glue and small screws: $3–$5
- Twine or small hooks: $2–$3
Estimated budget: $11–$25.
Tutorial how to make:
- Assemble a simple layered wooden tree using boards of decreasing lengths.
- Find thin, clean offcuts for the miniature ornaments.
- Draw basic shapes on the wood and cut them out carefully using suitable tools.
- Sand the ornaments until their edges are smooth.
- Paint some pieces red, green, gold, or white, leaving others natural for contrast.
- Attach the ornaments with small hooks, short pieces of twine, or carefully applied glue.
- Add a small wooden star at the top to complete the design.
DIY Tip
Keep the ornaments lightweight and relatively small. Heavy decorations can pull on thin branches or make a tabletop tree unstable.
8. Scrap Wood Christmas Tree with a Rustic Barnwood Look
Description
Use different shades and textures of reclaimed-looking wood to create a Christmas tree with a naturally aged appearance. The mix of weathered gray, warm brown, and faded white finishes gives the decoration character without requiring expensive materials.

What It Is
A layered wooden tree made from scrap boards with different rustic finishes. It can be displayed as a tabletop decoration or built larger for a wall or covered porch.
Supplies and Budget
- Scrap wood in different shades: free–$5
- Sandpaper: $2–$4
- Wood stain or paint: $4–$8
- Central support board: $2–$4
- Screws and wood glue: $3–$6
- Clear matte sealer: $3–$5
Estimated budget: $14–$32.
Tutorial how to make:
- Collect wood pieces with different grain patterns and natural color variations.
- Cut the pieces into gradually shorter branches.
- Sand away splinters while preserving some of the wood’s natural character.
- Apply different finishes to selected boards, such as light brown stain, diluted gray paint, or whitewash.
- Allow every piece to dry fully before assembly.
- Arrange the boards into a tree shape and fasten them to a central support.
- Apply a suitable matte protective finish once the entire structure is complete.
DIY Tip
Avoid trying to make every board look artificially old. Natural differences in color and grain usually create a more convincing reclaimed-wood appearance than heavy distressing.
9. Scrap Wood Christmas Tree with a Snowy White Finish
Description
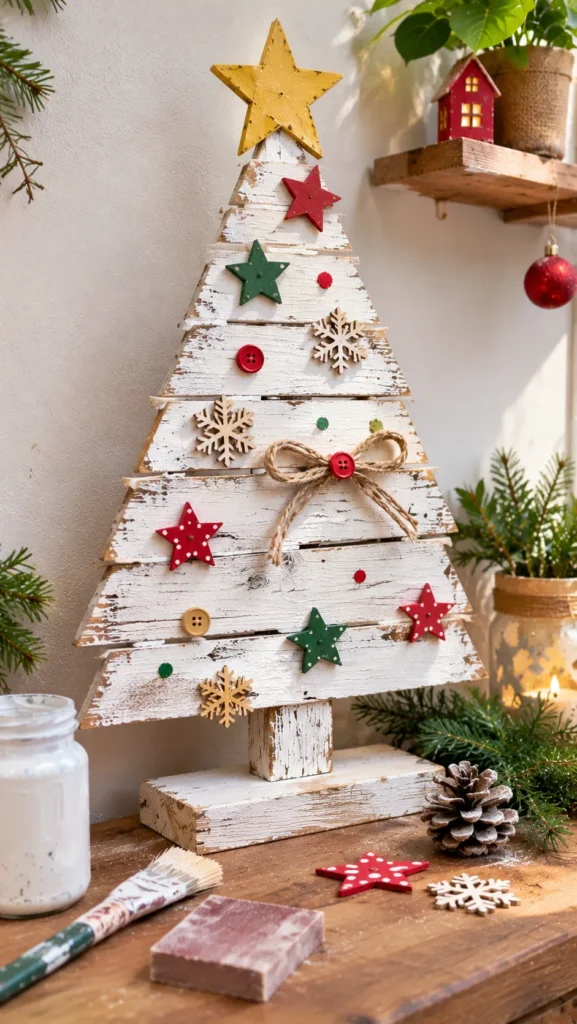
Make a winter-inspired wooden Christmas tree with white paint and a few subtle natural details. This simple decoration looks lovely beside a fireplace or on a console table, and you can add small wooden stars or greenery for a soft seasonal touch.
What It Is
A wooden tree made from stacked or layered scrap pieces, painted mostly white to create a snowy appearance. A little exposed wood grain or lightly distressed paint helps keep the finish from looking flat.
Supplies and Budget
- Scrap wood: free–$5
- White wood paint: $4–$7
- Primer if needed: $3–$5
- Sandpaper: $2–$3
- Wood glue and screws: $3–$5
- Small wooden star or decorative details: $1–$3
Estimated budget: $13–$28.
Tutorial how to make:
- Cut your wood into a series of branches that gradually become shorter toward the top.
- Sand the boards, especially the edges and corners.
- Apply primer if the wood has stains, strong color variations, or a surface that absorbs paint unevenly.
- Paint the pieces white in thin, even coats.
- Allow the paint to dry completely before lightly sanding selected edges for a subtle worn effect.
- Assemble the tree using a central support and appropriate fasteners.
- Add a small wooden star or a few natural greenery details.
DIY Tip
If you want a distressed finish, sand only a few edges rather than the entire surface. This keeps the tree looking softly aged instead of heavily scratched.
10. Wall-Mounted Scrap Wood Christmas Tree
Description
Save floor and table space with a handmade wooden Christmas tree that hangs directly on the wall. Its simple triangular shape makes it a practical choice for small homes, apartments, hallways, or any corner that needs a little holiday decoration.

What It Is
A flat or shallow wooden Christmas tree built from horizontal scrap boards attached to a backing support. The finished piece can be mounted on a suitable wall hook or hanging system, depending on its weight.
Supplies and Budget
- Scrap wood boards: free–$5
- Backing support: $2–$4
- Screws and wood glue: $3–$6
- Sandpaper: $2–$3
- Paint or stain: $3–$6
- Suitable wall-mounting hardware: $2–$5
Estimated budget: $12–$29.
Tutorial how to make:
- Measure the wall area where you want to display the tree.
- Cut several boards into gradually shorter lengths, leaving enough space between them for a clear tree silhouette.
- Sand every surface and check that no screws or nails are sticking out.
- Arrange the boards on a backing support and secure them with suitable screws.
- Apply paint or stain and let the finish dry completely.
- Attach wall-mounting hardware rated for the finished weight and the type of wall.
- Check that the tree hangs securely before adding any lightweight decorations.
DIY Tip
Do not rely on a small nail or adhesive strip for a heavy wooden tree. Weigh the finished decoration and choose wall hardware suitable for both the weight and wall material.
11. Scrap Wood Christmas Tree with a Built-In Planter Base
Description
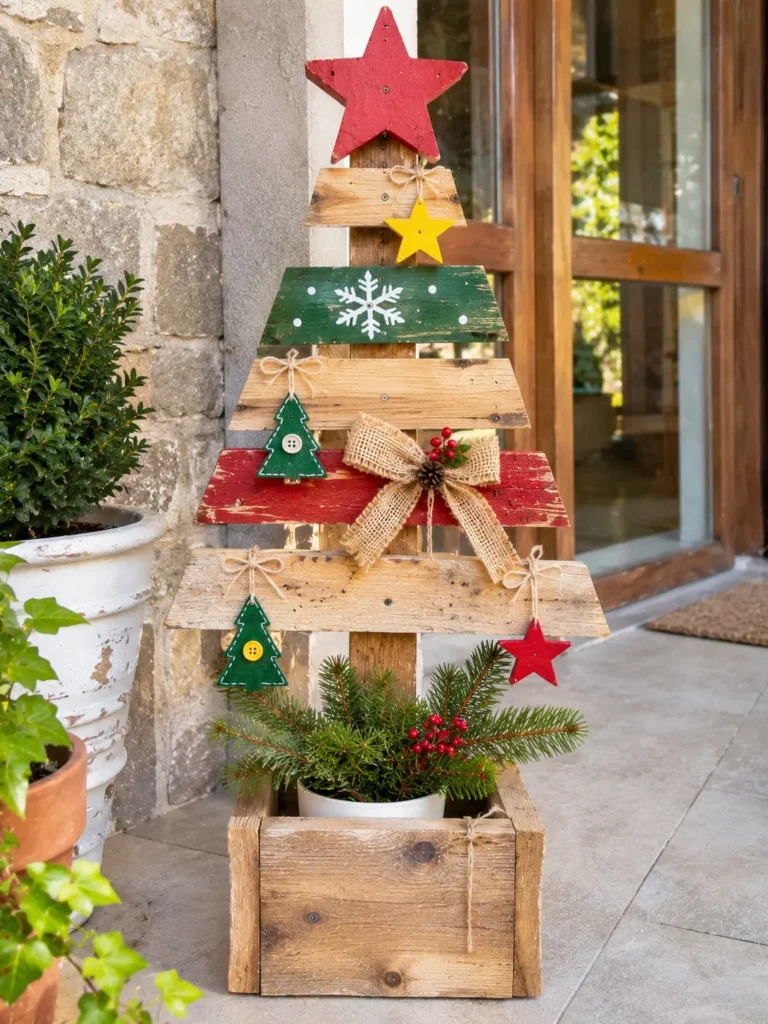
Combine rustic wood and fresh seasonal greenery by creating a wooden Christmas tree with a small planter-style base. The natural greenery softens the wooden structure and makes a beautiful display for a porch, entryway, or sheltered outdoor corner.
What It Is
A freestanding scrap wood tree supported by a sturdy wooden base designed to hold a small pot or decorative container. You can place a real seasonal plant inside or use artificial evergreen branches for a low-maintenance option.
Supplies and Budget
- Scrap wood for tree and base: free–$6
- Screws and wood glue: $3–$6
- Sandpaper: $2–$4
- Small planter or container: $3–$8
- Paint or exterior wood finish: $4–$8
- Small evergreen branches: $2–$5
Estimated budget: $14–$37.
Tutorial how to make:
- Build a layered wooden tree using a central support and gradually shorter horizontal branches.
- Create a stable base from thicker scrap wood, making sure it is wide enough to support the tree.
- Secure the tree firmly to the base with suitable screws.
- Sand rough surfaces and apply an appropriate finish for the intended location.
- Place a small planter or container in front of or inside the base structure, depending on your design.
- Add evergreen branches or a small potted plant, keeping the container separate from untreated wood.
- Check the balance carefully before displaying the decoration.
DIY Tip
If you use a real plant, keep wet soil and standing water away from the wood. A waterproof planter liner helps prevent moisture from damaging the base.
12. Large Outdoor Scrap Wood Christmas Tree
Description
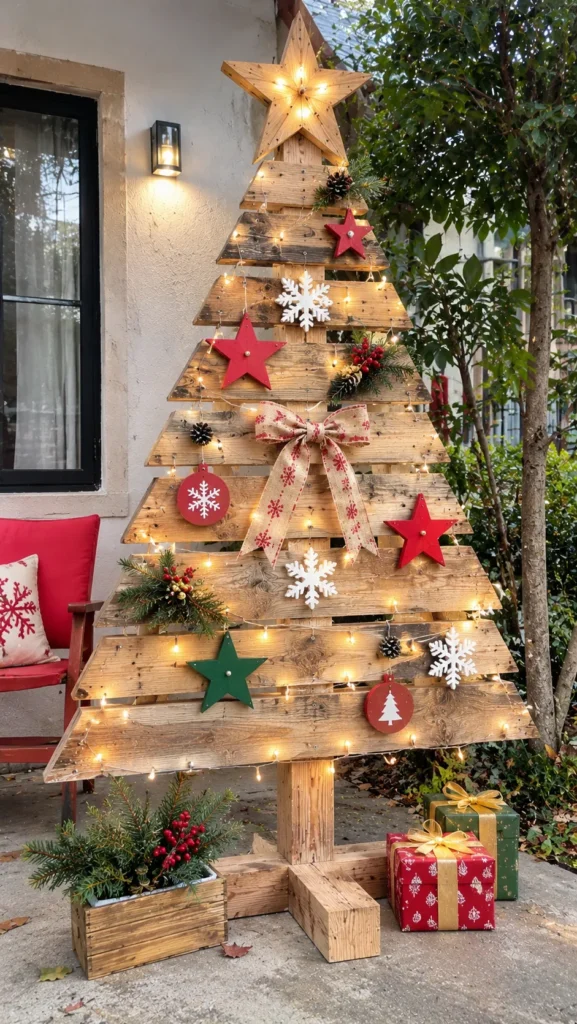
Turn larger leftover boards into a statement Christmas tree for your porch, garden, or outdoor entryway. This project can be kept simple with natural wood or decorated with weather-resistant paint and outdoor-safe ornaments for a welcoming festive display.
What It Is
A large freestanding or wall-mounted Christmas tree made from scrap boards arranged in a triangular shape. It is designed for outdoor display and can be customized with a star, painted details, or suitable LED lighting.
Supplies and Budget
- Larger scrap wood boards: free–$10
- Thick support board or timber base: $4–$8
- Exterior-rated screws: $3–$6
- Sandpaper: $2–$4
- Exterior wood paint or sealer: $5–$10
- Outdoor-rated LED lights: $5–$12
Estimated budget: $19–$50.
Tutorial how to make:
- Decide on the finished height and width before cutting the wood.
- Select sound boards without rot, deep cracks, or loose sections.
- Cut the boards into progressively shorter lengths to form the tree silhouette.
- Sand all edges and surfaces carefully to remove splinters.
- Attach the boards to a sturdy central support using exterior-rated screws.
- Build a wide, stable base or secure the tree to a suitable outdoor wall.
- Apply an exterior-rated finish, following the drying and recoat instructions.
- Add outdoor-rated decorations or LED lights, securing cables safely and protecting electrical connections from moisture.
DIY Tip
Outdoor wooden decorations need a stable base and a finish designed for exterior conditions. If your area gets strong wind, secure the tree properly rather than relying on its weight alone.
FAQ SECTION
What kind of scrap wood is best for making a Christmas tree?
Pine, cedar, and clean reclaimed boards are useful choices because they are relatively easy to cut and work with. Choose dry, straight pieces without rot, deep cracks, or loose nails. For outdoor decorations, use wood and finishes suitable for exterior exposure.
Can I make a scrap wood Christmas tree without power tools?
Yes. Small tabletop trees can be made from pre-cut wood pieces, thin craft boards, or leftover wooden strips. You can ask a hardware store or workshop to cut larger pieces to size, then assemble and decorate them at home with basic supplies.
How do I keep a wooden Christmas tree standing upright?
Use a stable base, a straight central support, and secure fasteners. For taller designs, make the base wider and heavier, or mount the tree securely to a wall. Always test its balance before adding decorations.
Should I paint or stain scrap wood before assembling the tree?
Both methods work. Painting individual pieces before assembly makes it easier to reach the edges, while staining after sanding can create a more consistent natural finish. Whichever method you choose, let the finish dry completely before assembling or decorating.
How can I make a scrap wood Christmas tree look more festive?
Try adding lightweight wooden stars, small ornaments, fabric bows, greenery, or battery-operated LED lights. A few colorful details can make a simple wooden shape feel festive without hiding its natural texture.
Are scrap wood Christmas trees suitable for outdoor use?
They can be, provided you use sound wood, exterior-rated finishes, suitable fasteners, and a stable mounting system. Keep untreated wood away from standing water and check the decoration regularly for loose pieces or weather damage.
RELATED CONTENT
- Christmas Banners Ideas DIY for a Handmade Holiday Look
- Rustic Christmas Decor Ideas for a Cozy Home
CLOSING
I love how a simple pile of leftover wood can become something special with just a little time and creativity. These scrap wood Christmas tree ideas are a lovely way to make your holiday decorations more personal while using materials you might already have at home.
You do not need perfect cuts, expensive tools, or professional woodworking skills to get started. Choose one design that matches your space, take your time with the sanding and assembly, and make it your own with colors and decorations you love.
I hope you found an idea that inspires your next Christmas project. If you try one of these handmade wooden trees, I would love to hear how it turned out and what little details you added. Happy crafting!