12 Christmas Banners Ideas DIY for a Handmade Holiday Look

Christmas Banners Ideas DIY
Christmas banners are such a simple way to make a home feel festive without spending too much on decorations. Hung above a fireplace, across a mantel, on a staircase, or over a doorway, a handmade banner adds color and personality to almost any room. I especially love projects that use affordable materials like felt, fabric scraps, kraft paper, and old holiday decorations because they are easy to customize and reuse.
The best part is that you do not need advanced crafting skills to make a beautiful Christmas banner. A few basic supplies, a little creativity, and some patience are usually enough. Before choosing your project, think about where you want to hang it.

A banner for a mantel can be heavier and more detailed, while one for a doorway or window should be lightweight and easy to secure.
Here are 12 creative Christmas banners ideas DIY projects, from colorful handmade designs to rustic decorations you can make with materials you may already have at home.
1. Classic Felt Christmas Banner with Colorful Letters
Description
A felt Christmas banner is a cheerful decoration that works beautifully above a mantel, doorway, or shelf. Its soft texture gives the lettering a handmade appearance, and you can choose colors that match your existing holiday decorations.

What It Is
This banner uses individual felt flags or rectangular panels, each carrying one letter to spell a festive message such as “MERRY CHRISTMAS.” Felt is easy to cut, does not fray like many woven fabrics, and comes in plenty of holiday colors.
Supplies and Budget
- Felt sheets in red, green, cream, and white: $3–$6
- Fabric scissors: $3–$5
- Fabric glue or needle and thread: $2–$4
- Ribbon or cotton cord: $2–$4
- Letter templates and pencil: free–$1
Estimated budget: $10–$20.
Tutorial how to make:
- Decide on your message and count the number of letters before cutting anything.
- Cut equal-sized felt flags or rectangles. A cardboard template helps keep the shapes consistent.
- Draw each letter on a separate felt piece and cut it carefully.
- Attach the letters with fabric glue or small hand stitches. Stitching usually lasts longer if you plan to reuse the banner.
- Fold the top edge of each flag over a cotton cord and secure it with glue or stitches.
- Space the flags evenly and leave extra cord at both ends for hanging.
DIY Tip
Test your letter size on one flag before cutting the entire set. Letters that are too large can look cramped, especially on curved banner shapes. Use cream or white letters against darker felt for better readability.
2. Rustic Burlap Christmas Banner with Stenciled Words
Description
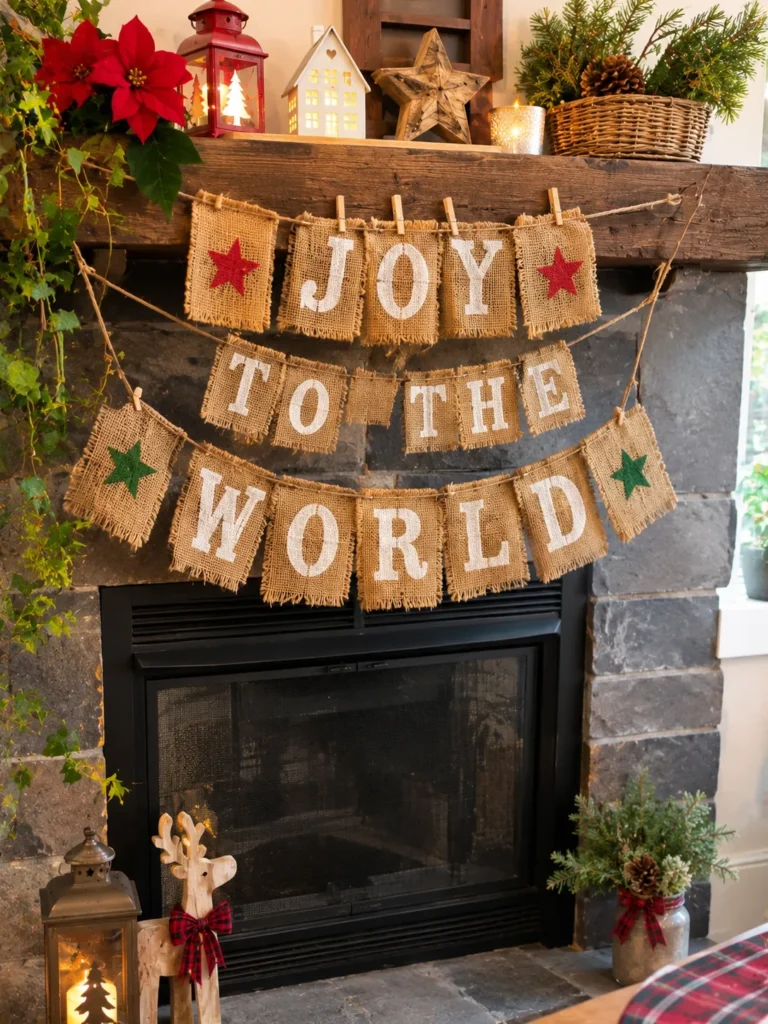
A burlap banner adds a relaxed farmhouse look to Christmas decorating. Its natural texture pairs beautifully with greenery, wooden furniture, and warm lights, making it a lovely option for a rustic mantel or entryway.
What It Is
This project uses burlap triangles or rectangular pieces decorated with simple Christmas words, such as “JOY,” “NOEL,” or “MERRY.” The pieces are attached to twine to create a lightweight rustic garland.
Supplies and Budget
- Burlap fabric or pre-cut burlap flags: $4–$7
- Twine or jute rope: $2–$4
- Letter stencils: $2–$5
- Fabric paint: $3–$5
- Small paintbrush and clips: $2–$3
Estimated budget: $13–$24.
Tutorial how to make:
- Cut burlap into equal triangles or rectangles. Cut slowly because burlap can unravel along the edges.
- Place a piece of cardboard underneath each flag to protect your work surface.
- Position a letter stencil in the center of each piece.
- Apply fabric paint with a nearly dry brush or sponge. Too much paint can spread through the loose weave.
- Let the letters dry completely before moving the flags.
- Attach each flag to twine using small wooden clips or by folding and stitching the top edge.
DIY Tip
If you want a cleaner result, apply a small amount of fabric glue along the cut edges to reduce fraying. Keep the lettering simple because detailed designs can be difficult to stencil on rough burlap.
3. DIY Christmas Candy Cane Striped Fabric Banner
Description
A candy cane-inspired banner brings classic Christmas colors into a room without looking too formal. Red and white striped fabric creates a playful holiday decoration that works especially well in kitchens, children’s rooms, and family living spaces.

What It Is
This banner is made from fabric panels decorated with diagonal red and white stripes. You can use striped fabric directly or create the pattern with fabric paint on plain cotton.
Supplies and Budget
- Red and white cotton fabric: $5–$8
- Fabric scissors: $3–$5
- Fabric paint, if needed: $3–$5
- Cotton ribbon or cord: $2–$4
- Fabric glue or sewing supplies: $2–$4
Estimated budget: $15–$26.
Tutorial how to make:
- Cut several equal-sized fabric panels using a cardboard template.
- If using plain fabric, mark diagonal stripe guidelines lightly with a pencil.
- Apply red fabric paint between the guidelines, leaving white spaces for the stripes.
- Let the paint dry fully according to the manufacturer’s instructions.
- Fold the top of each panel over the cord and stitch or glue it securely.
- Arrange the panels with equal spacing and hang the banner.
DIY Tip
Wash and iron the fabric before crafting if it is washable cotton. This helps prevent later shrinking and makes the panels easier to cut. Place cardboard beneath each panel while painting to stop color from transferring to the other side.
4. Handmade Christmas Paper Banner with Watercolor Letters
Description
A paper Christmas banner is an affordable project that is easy to personalize with hand-painted lettering. Watercolor shades create a soft, artistic look, while simple paper flags keep the decoration light enough for windows, walls, and shelves.

What It Is
This banner uses thick cardstock or watercolor paper cut into flags. Each piece features a painted letter, small holiday illustration, or festive pattern, then hangs from string or ribbon.
Supplies and Budget
- Thick cardstock or watercolor paper: $3–$6
- Watercolor paints: $3–$6
- Paintbrushes: $2–$4
- Hole punch: $2–$4
- Ribbon or cotton string: $2–$3
Estimated budget: $12–$23.
Tutorial how to make:
- Cut the paper into matching flags or rectangles.
- Lightly sketch the letters before painting so you can check spacing.
- Paint each letter with watercolor, using a small brush for more control.
- Add simple details such as tiny stars, berries, snowflakes, or holly leaves.
- Allow the paper to dry flat before handling it.
- Punch two holes near the top corners of each flag and thread the string through them.
DIY Tip
Use heavier paper rather than thin printer paper. Watercolor can make lightweight paper curl or wrinkle. If the flags bend after drying, place them between clean sheets of paper under a heavy book.
5. DIY Christmas Pom-Pom Banner
Description
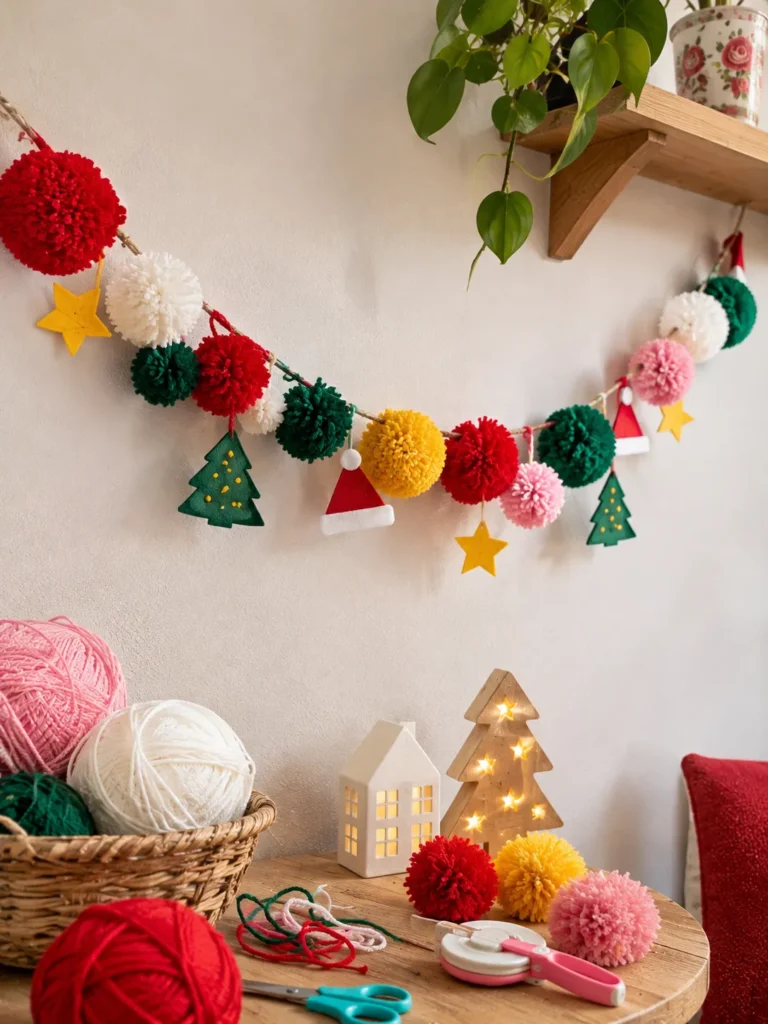
A pom-pom banner adds soft texture and playful color to holiday decorating. It is especially cute above a child’s bed, across a bookshelf, or on a festive party table, and you can make it with leftover yarn.
What It Is
This banner features handmade yarn pom-poms attached to a long piece of string. You can use traditional red, green, and white or mix in pink, yellow, and turquoise for a more colorful Christmas look.
Supplies and Budget
- Yarn in several colors: $5–$9
- Pom-pom maker or cardboard circles: $1–$4
- Scissors: $3–$5
- Cotton cord: $2–$3
- Needle or small clips: $1–$2
Estimated budget: $12–$23.
Tutorial how to make:
- Make pom-poms using a pom-pom maker or two cardboard rings.
- Wrap yarn around the rings until the pom-pom looks full.
- Cut the yarn around the outer edge and tie the center tightly.
- Trim uneven strands to create a rounded shape.
- Repeat in different colors and sizes.
- Attach each pom-pom to the cord with its long tying strand or secure it with a few stitches.
DIY Tip
Do not trim all the pom-poms too aggressively. Slight differences in size make the banner look handmade and charming. Tie each pom-pom firmly so it does not slide along the cord.
6. Vintage Christmas Banner Made from Fabric Scraps
Description
A fabric scrap banner is a lovely way to reuse leftover materials while creating a nostalgic Christmas decoration. Mixing small floral prints, plaid, gingham, and plain fabrics gives the finished banner a collected, vintage-inspired appearance.

What It Is
This banner uses narrow fabric strips or small fabric flags tied or stitched along a long piece of ribbon. Each piece can have a different pattern, so there is no need to make every section identical.
Supplies and Budget
- Fabric scraps: free–$5
- Cotton ribbon or jute cord: $2–$4
- Scissors or rotary cutter: $3–$6
- Sewing supplies or fabric glue: $2–$4
- Optional lace and buttons: $2–$4
Estimated budget: $7–$23.
Tutorial how to make:
- Gather fabric scraps in a coordinated color palette.
- Cut strips of similar length and width, or make small triangular flags.
- Arrange the fabrics on the floor before attaching them so the patterns are balanced.
- Tie the strips along the ribbon or stitch the flags to a fabric backing.
- Add a few lace pieces, small buttons, or ribbon bows.
- Trim any long loose threads and hang the banner.
DIY Tip
Use a limited palette of three or four main colors. Too many unrelated patterns can make the banner look busy. If using fabric glue, test it on a scrap first because some adhesives can leave stiff marks.
7. DIY Christmas Tree Banner with Mini Felt Trees
Description
A mini Christmas tree banner creates a sweet woodland-inspired decoration with very little material. Repeating small felt trees along a string gives the display a coordinated look, while different colors and simple decorations make each tree unique.

What It Is
This project uses small felt Christmas tree shapes attached to twine or ribbon. Each tree can be decorated with tiny buttons, beads, felt circles, or simple stitched ornaments.
Supplies and Budget
- Green felt sheets: $3–$5
- Small felt pieces in assorted colors: $2–$4
- Twine or ribbon: $2–$3
- Fabric glue or needle and thread: $2–$4
- Small buttons or beads: $2–$4
Estimated budget: $11–$20.
Tutorial how to make:
- Draw one simple Christmas tree shape on cardboard and use it as a template.
- Cut out matching trees from green felt.
- Add small circles, stars, or tiny felt ornaments to each tree.
- Secure the decorations with fabric glue or hand stitches.
- Attach the trees to twine using small clips or a stitched felt loop.
- Space them evenly and leave enough cord at both ends for hanging.
DIY Tip
Keep the decorations lightweight so the felt trees hang straight. If you are crafting with young children, use larger felt shapes and fabric glue instead of small beads or buttons that could be choking hazards.
8. Christmas Gingerbread House Banner
Description
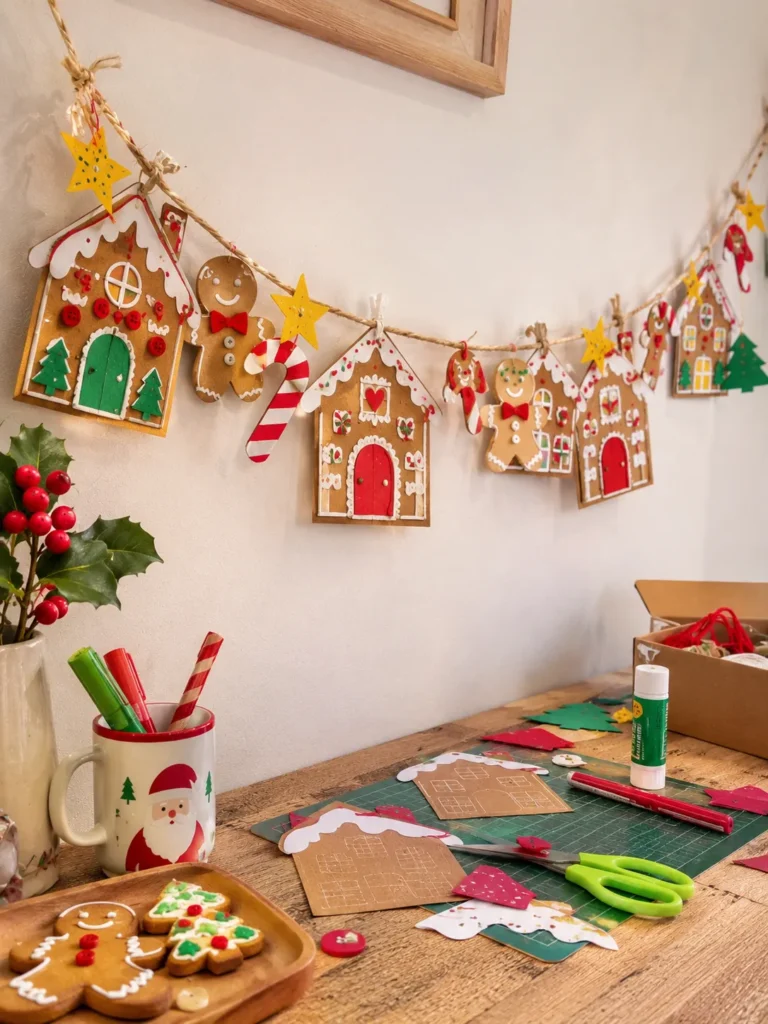
A gingerbread house banner brings a playful bakery-inspired touch to a Christmas kitchen or dining area. Small house shapes decorated with colorful icing-style details look adorable together and can be customized with candy-colored paper or felt.
What It Is
This banner is made from repeated gingerbread house shapes, each decorated with white outlines, colorful windows, doors, and candy-inspired details. The shapes are connected with ribbon or twine.
Supplies and Budget
- Brown cardstock or felt: $3–$5
- White paint pen or fabric paint: $2–$4
- Colored paper or felt scraps: $2–$4
- Ribbon or twine: $2–$3
- Glue and scissors: $2–$4
Estimated budget: $11–$20.
Tutorial how to make:
- Draw a simple house shape with a pointed roof on cardboard.
- Use the template to cut several matching houses from brown cardstock or felt.
- Draw white icing-style lines along the roof and edges.
- Add colorful doors, windows, candy dots, and tiny wreaths.
- Let the decorations dry completely if you use paint.
- Attach each house to ribbon or twine with small clips or punched holes.
DIY Tip
Use a white paint pen for thinner details instead of applying thick paint with a brush. It gives you better control over the icing-style lines and reduces the chance of smudging.
9. DIY Christmas Star Garland Banner
Description
A Christmas star banner is a simple way to add a little sparkle without using bulky decorations. Handmade stars can be made from cardstock, felt, or lightweight metallic paper and arranged in a repeating pattern across a mantel or window.

What It Is
This banner features a series of star shapes in different sizes, attached to a string or ribbon. You can keep the stars in classic gold and silver or mix them with colorful Christmas shades.
Supplies and Budget
- Gold, silver, or colored cardstock: $3–$6
- Star template: free
- Scissors: $3–$5
- Ribbon or cotton cord: $2–$3
- Hole punch and glue: $2–$4
Estimated budget: $10–$18.
Tutorial how to make:
- Draw or print a star template in two or three sizes.
- Trace the shapes onto cardstock and cut them out carefully.
- Layer smaller stars over larger ones if you want a dimensional look.
- Add small dots, lines, or simple patterns using a paint pen.
- Punch a small hole near the top of each star.
- Thread the stars onto the cord and adjust the spacing before hanging.
DIY Tip
Choose cardstock that is thick enough to hold its shape but not so heavy that the string sags. If the stars keep turning sideways, use two attachment points instead of one.
10. DIY Christmas Stocking Banner
Description
A mini stocking banner adds a traditional Christmas touch to a fireplace, staircase, or bedroom wall. Each little stocking can be decorated differently, making this a fun project for using leftover felt, ribbon, and fabric scraps.

What It Is
This banner uses several small handmade stocking shapes attached to a long piece of twine. You can add initials, tiny bows, buttons, or simple patterns to make each stocking feel personal.
Supplies and Budget
- Red, green, and cream felt: $4–$7
- Twine or ribbon: $2–$3
- Fabric glue or sewing supplies: $2–$4
- Buttons and small decorations: $2–$4
- Paper template and scissors: $2–$4
Estimated budget: $12–$22.
Tutorial how to make:
- Draw a small stocking shape on cardboard and cut it out to make a template.
- Cut two matching felt pieces for each stocking.
- Join the edges with simple hand stitches or fabric glue, leaving the top open.
- Add a contrasting felt cuff and decorate the front.
- Attach a small loop to each stocking.
- Thread the loops onto twine and arrange the stockings with even spacing.
DIY Tip
If you want the stockings to hold their shape, use slightly thicker felt. Avoid adding heavy decorations because small stockings can easily turn upside down when hung from lightweight twine.
11. DIY Christmas Message Banner with Chalkboard Flags
Description
A chalkboard-style Christmas banner is perfect if you enjoy changing your holiday messages from year to year. Its dark background makes white lettering stand out, while small seasonal illustrations add a personal handmade touch.
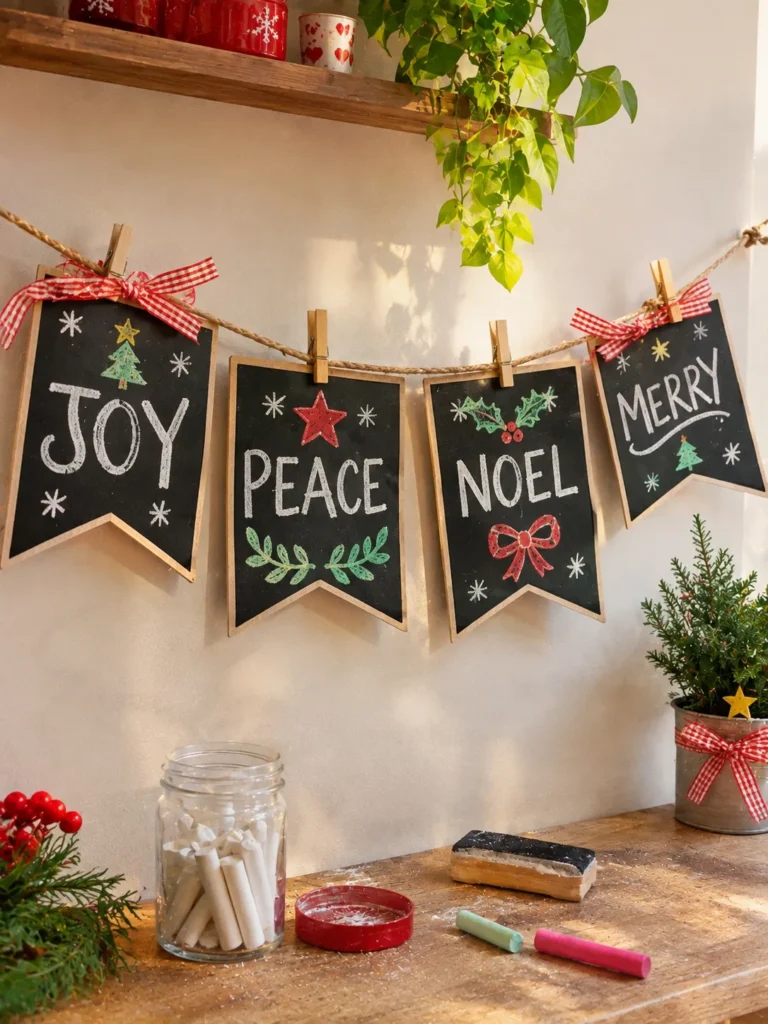
What It Is
This banner uses small chalkboard panels or black cardstock flags decorated with chalk markers. You can write short messages such as “JOY,” “PEACE,” or “LET IT SNOW.”
Supplies and Budget
- Small chalkboard panels or black cardstock: $3–$7
- White chalk markers: $3–$5
- Ribbon or twine: $2–$3
- Hole punch: $2–$4
- Optional mini clips: $2–$3
Estimated budget: $12–$22.
Tutorial how to make:
- Cut equal-sized flags from black cardstock or prepare small chalkboard panels.
- Lightly sketch the message to check the letter spacing.
- Write each letter with a white chalk marker.
- Add small snowflakes, stars, or holly illustrations around the words.
- Allow the marker to dry according to its instructions.
- Attach the flags to ribbon using holes or mini clips.
DIY Tip
Practice your lettering on scrap paper first. Chalk markers can be difficult to erase from some surfaces, so check whether your panels are reusable before writing directly on them.
12. Colorful DIY Christmas Gift Tag Banner
Description
A gift tag banner is a creative way to turn leftover Christmas tags into a cheerful wall decoration. Combining different shapes, handwritten messages, and colorful ribbons creates a relaxed handmade display that looks especially sweet above a console table or holiday gift station.

What It Is
This banner uses large decorative gift tags connected with string or ribbon. Each tag can feature a festive word, a small illustration, a name, or a simple Christmas pattern.
Supplies and Budget
- Colored cardstock or blank gift tags: $3–$5
- Markers and paint pens: $3–$5
- Ribbon and twine: $2–$4
- Hole punch: $2–$3
- Stickers, buttons, or paper scraps: $2–$4
Estimated budget: $12–$21.
Tutorial how to make:
- Cut large gift tag shapes from cardstock in different colors.
- Punch a hole near the top of each tag.
- Decorate them with handwritten Christmas words, stars, trees, or simple illustrations.
- Add small pieces of ribbon through the holes.
- Thread the tags onto a longer cord, leaving a little space between each one.
- Adjust the arrangement and hang it above a gift-wrapping station or mantel.
DIY Tip
Mix two or three tag shapes rather than making every piece identical. Keep the lettering large and easy to read, especially if the banner will hang across a wide wall.
FAQ SECTION
What is the easiest Christmas banner to make?
A paper banner or fabric scrap banner is one of the easiest options. Both require only a few basic supplies, and you can customize the colors and message without needing sewing experience.
What materials are best for making a DIY Christmas banner?
Felt, burlap, cardstock, cotton fabric, ribbon, and yarn are all useful materials. Choose based on where the banner will hang. Felt and fabric are good for reusable indoor decorations, while paper works well for lightweight seasonal displays.
How do I hang a Christmas banner without damaging the wall?
Try removable adhesive hooks, damage-free hanging strips, or existing curtain rods and mantel hooks. Always check the weight limit and the surface instructions before attaching anything.
How long should a Christmas banner be?
Measure the space where you want to hang it before crafting. A mantel banner should usually be slightly shorter than the mantel itself, while a doorway banner can extend across the opening with a little extra cord at both ends.
Can I make Christmas banners with kids?
Absolutely. Paper flags, felt shapes, pom-poms, and decorated gift tags are great projects for children. Choose age-appropriate scissors and adhesives, supervise younger children, and avoid small decorations that could be choking hazards.
How can I store handmade Christmas banners?
Make sure fabric and felt banners are completely clean and dry before storing them. Roll them loosely around a cardboard tube or place them flat in a labeled storage box. Avoid folding delicate paper decorations if you want to reuse them.
How do I make a homemade Christmas banner look more polished?
Use a consistent color palette, keep the spacing fairly even, and make sure the lettering is easy to read. Small variations are part of the charm, but planning the layout before attaching everything helps avoid overcrowding.
RELATED CONTENT
CLOSING
A handmade Christmas banner is one of those little decorations that can make a room feel extra special during the holidays. Whether you love the rustic look of burlap, the playful colors of felt, or the charm of simple paper crafts, there is an idea here that you can make your own.
You do not need expensive supplies or perfect crafting skills. Start with a message and a few materials you already have, then add your own colors, patterns, and personal details. I hope these Christmas banners ideas DIY have inspired you to create something beautiful for your home this season.
I would love to see which banner you decide to make and how you style it in your home. Happy crafting and Merry Christmas!