
12 Button Crafts to Sell at Craft Fairs and Online

Button Crafts to Sell
Buttons may be small, but they offer endless possibilities for creating charming handmade products that people love to buy. With different colors, shapes, sizes, and textures, ordinary buttons can become beautiful accessories, home decorations, gifts, and personalized keepsakes. They are also an affordable material to work with, especially if you buy them in bulk, reuse vintage collections, or find interesting buttons at thrift stores.

If you are thinking about starting a small handmade business, button crafts are a great place to experiment. You do not need an expensive workshop or complicated equipment to get started. What matters most is choosing projects that look attractive, are well-made, and offer something customers cannot easily find in ordinary stores. Below are 12 creative button crafts to sell, with practical instructions, material suggestions, and helpful tips for making products that are both beautiful and suitable for a small craft business.
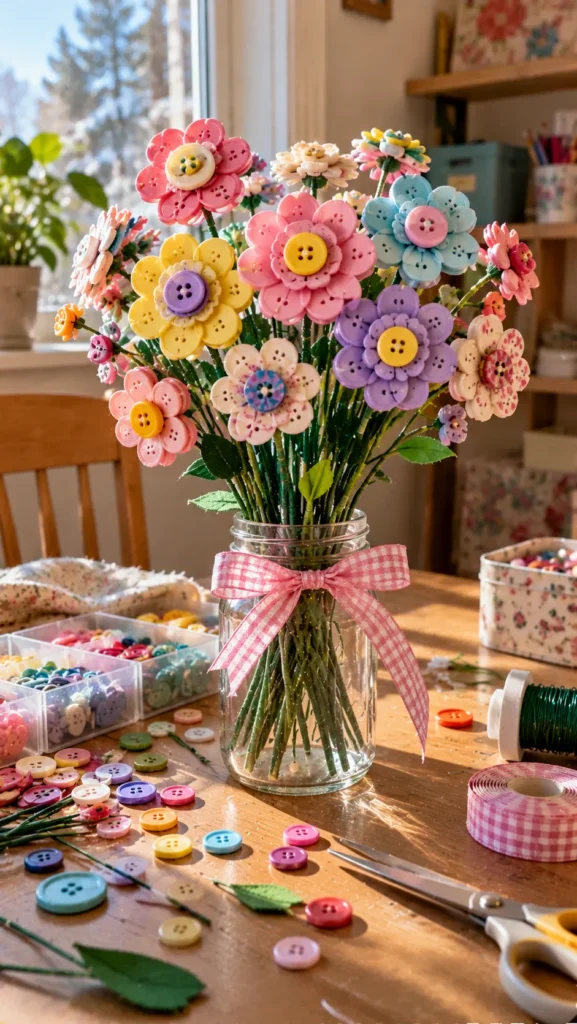
1. Handmade Button Flower Bouquets
Description
Button flower bouquets are colorful, reusable decorations that make thoughtful gifts for birthdays, teachers, and special occasions. Each flower can have a different combination of buttons, creating a playful handmade appearance. They are lightweight, easy to customize, and suitable for selling individually or in small arrangements.
What You’ll Need
- Colorful buttons in different sizes
- Floral wire or flexible craft wire
- Green floral tape
- Small decorative beads
- Ribbon and wrapping paper
Quick How-To
Choose two or three buttons for each flower, arranging them from largest to smallest. Thread floral wire through the button holes and twist the wire underneath to secure the layers. Create several flowers, wrap the stems with green floral tape, and arrange them into a bouquet. Finish with a ribbon and simple gift wrapping. Check that every button is firmly attached before selling.
Styling Tip
Use coordinated colors such as pink, cream, and lavender for romantic bouquets, or bright yellow, turquoise, and red for cheerful gifts. Offer different bouquet sizes to suit different budgets.
2. Decorative Button Picture Frames
Description
A plain picture frame can become a colorful handmade gift with carefully arranged buttons. These frames work well for birthdays, nursery decorations, family photographs, and personalized presents. Their strongest selling point is customization, allowing customers to choose colors or themes that match a particular room or occasion.

What You’ll Need
- Plain wooden or cardboard picture frames
- Buttons in different colors and sizes
- Strong craft glue suitable for the frame material
- Small decorative beads
- Clear protective finish, if suitable
Quick How-To
Clean the frame and arrange the buttons on its surface before gluing. Start with larger buttons, then fill smaller spaces with tiny buttons or beads. Keep the photo opening clear and allow the adhesive to cure fully according to its instructions. If using a protective finish, test it on a sample first to make sure it does not damage the buttons.
Styling Tip
Create themed collections such as pastel nursery frames, colorful rainbow frames, or neutral farmhouse-style frames. Personalized names or short messages can help make each frame feel more special.
3. Handmade Button Earrings
Description
Button earrings are small accessories that can be produced in many styles, from colorful everyday pieces to elegant vintage-inspired designs. They require relatively little material, making them a practical product for a small handmade shop. The most important factors are comfortable earring components, secure attachments, and a clean finish.

What You’ll Need
- Lightweight decorative buttons
- Earring posts or hooks
- Suitable jewelry adhesive
- Earring backs
- Small pliers and jewelry findings
Quick How-To
Choose lightweight buttons with attractive colors or interesting patterns. Attach each button to an appropriate earring post or connector using jewelry adhesive or a suitable jewelry-making method. Follow the adhesive curing instructions and test the strength of each connection before packaging. Use matching pairs and make sure the edges are smooth and comfortable against the skin.
Styling Tip
Make small collections with different themes, such as floral buttons, colorful retro styles, or simple neutral pairs. Clearly describe the materials used and avoid making hypoallergenic claims unless the components are verified.
4. Colorful Button Bookmarks
Description
Button bookmarks are affordable, practical products that make lovely gifts for readers, teachers, and students. They are easy to produce in different color combinations and can be sold individually or as small gift sets. Their compact size also makes them simple to package and ship.

What You’ll Need
- Decorative buttons
- Ribbon, elastic cord, or narrow fabric strips
- Felt or sturdy cardstock
- Strong craft glue
- Scissors and optional decorative beads
Quick How-To
Cut a strip of ribbon or felt to the desired length for the bookmark. Attach a decorative button to one end using a secure stitching or suitable adhesive method. Add a small felt backing if needed to cover rough edges. For elastic versions, measure the loop carefully so it fits different book sizes without stretching too tightly.
Styling Tip
Create themed sets using matching colors, such as floral, rainbow, pastel, or autumn-inspired designs. Package two or three bookmarks together with a simple handmade paper label.
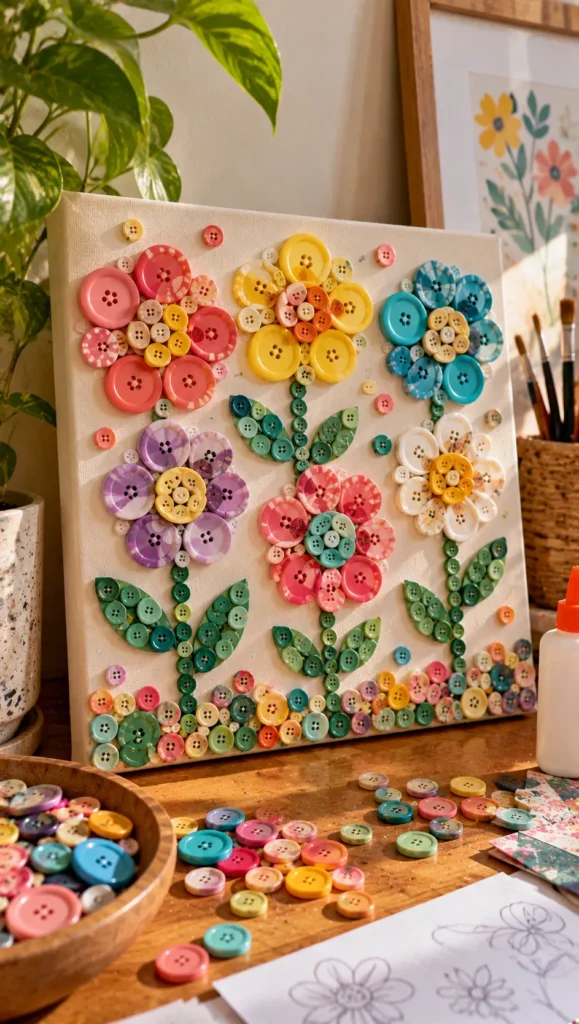
5. DIY Button Wall Art
Description
Button wall art transforms ordinary buttons into colorful pictures that can decorate bedrooms, craft rooms, nurseries, or creative workspaces. Flowers, hearts, trees, initials, and simple abstract patterns are especially suitable because they can be created using different button sizes and colors.
What You’ll Need
- Canvas or sturdy art board
- Buttons in assorted colors and sizes
- Strong craft adhesive
- Pencil and simple design template
- Frame, if desired
Quick How-To
Lightly draw your chosen design on the canvas. Sort buttons by color and size, then arrange them along the outline before gluing. Use larger buttons for the main shapes and smaller ones to fill gaps. Work in small sections and allow the adhesive to dry fully before moving or framing the artwork. Keep the finished piece flat while it cures.
Styling Tip
Offer personalized initials and birth-flower-inspired color combinations. A consistent collection of three coordinated artworks can also encourage customers to purchase matching sets.
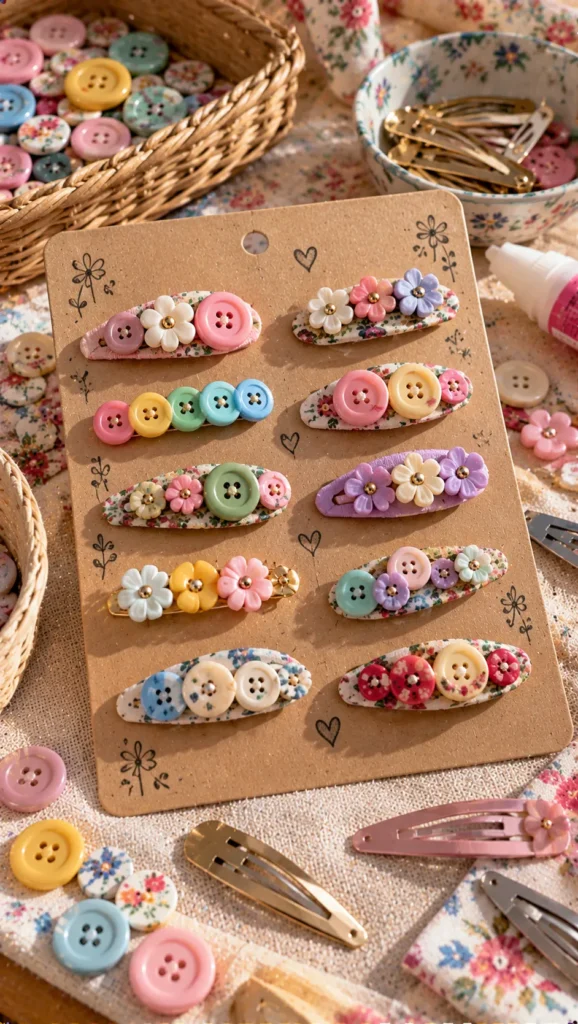
6. Handmade Button Hair Clips and Barrettes
Description
Button hair accessories are charming handmade products for people who enjoy colorful, playful details. By attaching decorative buttons to simple hair clips or barrettes, you can create affordable accessories for everyday outfits, themed gifts, and special occasions. Lightweight designs are usually more comfortable and practical.
What You’ll Need
- Plain metal or fabric-covered hair clips
- Flat-backed decorative buttons
- Strong adhesive suitable for the clip material
- Felt backing, if needed
- Small decorative beads
Quick How-To
Clean the clip surface and select buttons that fit without extending too far beyond the edges. Arrange the buttons before applying adhesive, then attach them securely. If needed, add a small felt backing to improve the finish. Let each piece cure completely and check that the buttons cannot easily detach during normal handling.
Styling Tip
Create coordinated collections with pastel flowers, bright rainbow colors, or vintage-inspired buttons. Make sure the finished clips are comfortable, lightweight, and free from sharp edges.
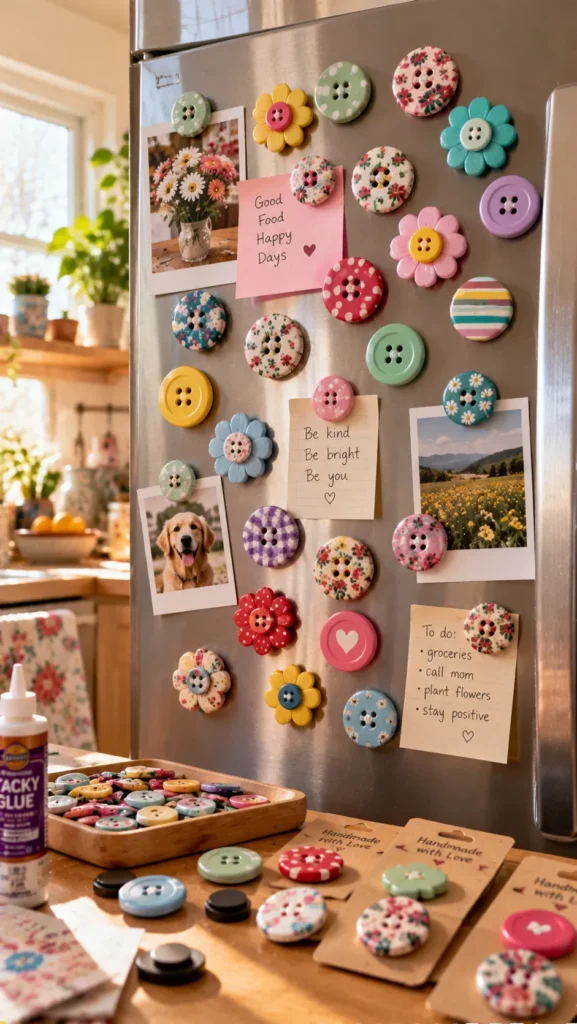
7. Decorative Button Magnets
Description
Button magnets are small, useful items that make excellent low-cost gifts and market-stall products. They can brighten refrigerators, office boards, and magnetic noticeboards. Because customers often enjoy collecting small decorative pieces, themed sets can be an effective way to present them.
What You’ll Need
- Large decorative buttons
- Small magnets
- Suitable strong adhesive
- Felt or backing pieces, if needed
- Small gift boxes or display cards
Quick How-To
Select buttons with a flat back and enough surface area for the magnet. Attach the magnet using an adhesive suitable for both materials, following the manufacturer’s instructions. Let the pieces cure completely before testing them on a magnetic surface. Check that the magnets are firmly attached and that the button design does not make the finished piece unstable.
Styling Tip
Sell magnets in sets of three or five with themes such as flowers, colorful patterns, fruit, or seasonal designs. Include a small backing card to make the set look gift-ready.
8. Button Embellished Tote Bags
Description
A plain fabric tote bag can become a unique handmade accessory with a carefully arranged button design. This project offers room for creativity, from small floral details to colorful initials and decorative borders. It can also appeal to customers looking for personalized gifts or reusable shopping bags.

What You’ll Need
- Plain cotton or canvas tote bags
- Strong buttons in different sizes
- Needle and strong thread
- Fabric backing pieces
- Scissors and washable fabric marker
Quick How-To
Wash and dry the tote bag according to its care instructions before decorating. Sketch a simple design using a washable fabric marker. Sew each button securely onto the fabric, using strong thread and firm stitches. Add a fabric backing inside if needed to protect the stitching. Avoid relying on ordinary craft glue for a bag that will be carried and washed.
Styling Tip
Create small collections with floral corners, colorful initials, or simple geometric patterns. Include clear care instructions and recommend gentle washing to help preserve the decoration.
9. Handmade Button Christmas Ornaments
Description
Button Christmas ornaments are seasonal products that can add color and handmade charm to holiday decorations. Stars, trees, wreaths, and snowflakes are easy shapes to create using assorted buttons. They are especially suitable for small gift sets, craft fairs, and personalized holiday collections.

What You’ll Need
- Buttons in festive colors
- Cardboard, felt, or a suitable ornament base
- Ribbon or hanging cord
- Strong craft glue or needle and thread
- Small decorative beads
Quick How-To
Cut your chosen shape from cardboard or felt. Arrange buttons across the surface, starting with larger pieces and filling the gaps with smaller ones. Attach them securely using an appropriate adhesive or stitching method. Add a hanging loop and let the ornament dry fully before packaging. Check that the loop and decorations can support the ornament’s weight.
Styling Tip
Offer different themes, such as traditional red and green, soft Scandinavian neutrals, or colorful retro Christmas designs. Matching sets of three ornaments can make attractive holiday gifts.
10. Decorative Button Coasters
Description
Button coasters are colorful handmade home accessories that can make a table setting feel more personal. They work particularly well with coordinated color palettes and simple geometric patterns. Since coasters are used regularly, a strong base and durable construction are essential if you plan to sell them.

What You’ll Need
- Flat decorative buttons
- Cork or felt coaster bases
- Strong suitable craft adhesive
- Non-slip backing
- Protective finish compatible with the materials
Quick How-To
Arrange the buttons on the coaster base, keeping the surface as even as possible. Choose flatter buttons to reduce wobbling and avoid leaving large gaps. Attach them securely and allow the adhesive to cure completely. Add a non-slip backing if needed. Test the finished coaster with a cup before listing it for sale, and explain that it is decorative rather than heatproof unless tested for heat resistance.
Styling Tip
Make sets using complementary colors such as navy and cream, sage and beige, or pink and gold. Package four matching coasters together with a simple paper band.
11. Button Decorated Greeting Cards
Description
Button greeting cards combine traditional paper crafting with colorful three-dimensional details. They are ideal for birthdays, thank-you messages, Mother’s Day, and other occasions. Since customers often look for thoughtful cards that feel more personal than mass-produced designs, handmade button cards can be a lovely small product.

What You’ll Need
- Blank cardstock cards
- Small decorative buttons
- Strong paper craft adhesive
- Colored paper and markers
- Envelopes and packaging sleeves
Quick How-To
Fold cardstock into a card and plan a simple design, such as button flowers, balloons, hearts, or a little tree. Attach buttons securely, then add stems, strings, or other details with markers. Write or stamp a short greeting inside if offering ready-to-send cards. Check that the card still closes properly and fits inside its envelope without crushing the decorations.
Styling Tip
Create occasion-based collections with matching envelopes. A set of three different button flower cards can be an attractive gift for people who enjoy sending handwritten notes.
12. Personalized Button Name Signs
Description
Button name signs are personalized decorations that can be made for children’s bedrooms, nurseries, craft spaces, and handmade gift collections. Colorful buttons can fill large letters or create decorative borders around a name, giving each piece a playful and distinctive finish.

What You’ll Need
- Wooden letters or sturdy canvas boards
- Buttons in assorted colors and sizes
- Strong craft adhesive
- Paint and paintbrushes
- Ribbon or suitable hanging hardware
Quick How-To
Paint the wooden letters or board in a suitable background color and allow it to dry. Arrange the buttons inside the letters or along their outlines, testing the layout before attaching them. Use a mixture of button sizes to fill the spaces naturally. Secure each button with suitable adhesive and allow the entire piece to cure. Add appropriate hanging hardware and check that it is securely fitted before selling.
Styling Tip
Offer customers a choice of color palettes, such as pastel rainbow, ocean blue, woodland green, or bright primary colors. Personalized products are easier to distinguish from mass-produced decorations, so show clear examples of different customization options.
FAQ SECTION
Are button crafts profitable to sell?
Button crafts can be profitable when material costs, production time, packaging, and selling fees are included in the price. Smaller products such as bookmarks, magnets, and greeting cards can be affordable entry points, while personalized signs and wall art can support higher prices.
Where can I buy buttons for crafts?
You can find buttons at craft stores, fabric shops, thrift stores, online craft suppliers, and secondhand clothing markets. Buying assorted buttons in bulk can reduce costs, but check their quality, sizes, and colors before purchasing large quantities.
What button crafts are easiest for beginners to sell?
Bookmarks, decorative magnets, greeting cards, and simple Christmas ornaments are good beginner projects. They use relatively few materials and allow you to practice making consistent, well-finished products.
How should I price handmade button crafts?
Calculate the cost of buttons, bases, adhesives, packaging, and other supplies. Then include the time required to make each item, platform fees, and a reasonable profit margin. Compare similar handmade products to understand what customers may be willing to pay.
Where can I sell button crafts?
You can sell handmade button crafts on Etsy, at local craft fairs, through social media, or in small gift shops that accept products from local makers. Take clear photographs and explain the materials, dimensions, and customization options.
How can I make button crafts look more professional?
Use a consistent color palette, clean up glue marks, secure every button properly, and check the finished product for rough edges or loose parts. Simple, well-finished designs often look more attractive than projects with too many decorations.
What should I consider when selling button crafts for children?
Avoid loose small buttons and detachable decorations in products intended for young children, as they can pose a choking hazard. Clearly describe the intended age group and use appropriate safety standards for any products marketed to children.
How can I make my button crafts stand out?
Offer personalized colors, names, themes, or gift packaging. Using unusual vintage buttons or creating coordinated collections can also help your products feel distinctive.
RELATED CONTENT
CLOSING
Button crafts are a lovely reminder that you do not need expensive materials to create something people appreciate. A simple collection of colorful buttons can become thoughtful gifts, useful accessories, and unique home decorations when you combine creativity with careful finishing.
If you are starting a handmade business, choose two or three projects that you genuinely enjoy making. Create a few samples, calculate your costs, and see which designs attract the most interest before investing in larger quantities of supplies. Most importantly, give yourself room to experiment and develop a recognizable style.
I hope these ideas inspire you to turn your button collection into something special. Pick your favorite project, give it your own creative touch, and share your handmade results. I would love to see what you create!

One Comment